How to Use the Dodge and Burn Tools, and Use Them Non-Destructively

Learn how to use the destructive Dodge and Burn tools in a non-destructive way.
The Dodge and Burn tools are used to lighten (Dodge) or darken (Burn) areas of an image that are under or over-exposed. They are tools, however, that work in a destructive manner; that is, they permanently change (damage) the pixels in your image.
In this tutorial, you will learn how to use the Dodge and Burn tools in a non-destructive way, which will not only save your original image from damage but will also give you more control and flexibility when using these tools.
This technique works exactly the same in Photoshop and Photoshop Elements.
Step 1: Open an Image
Open a photograph or a digital image that has areas that you wish to lighten and/or darken. Or if you wish to follow along with me, download the half-moon image that I will be working with for this tutorial.

Step 2: Add a Layer
- Hold down Alt (Mac: Option) and in the Layers Panel, click on the Add a New Layer icon.
- In the Dialog Box, name the New Layer “Dodge & Burn;” Tick “Use Previous Layer to Create Clipping Mask;” set the Mode to Overlay, and tick the “Fill with Overlay-neutral color 50% gray” box.

Note: Because the Mode is set to Overlay, you will not notice a visible change on your document.
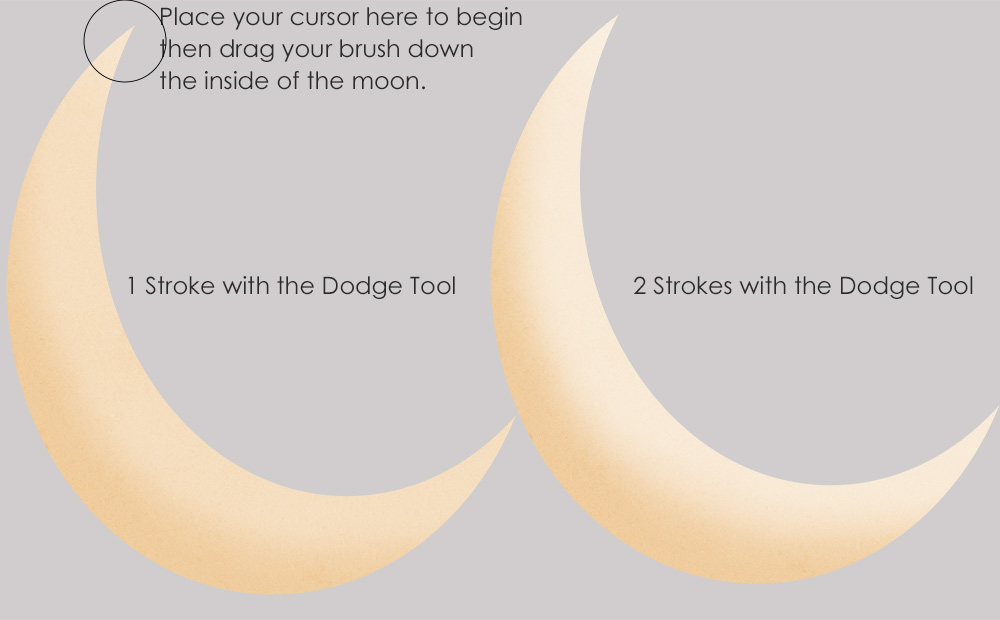
Step 3: Dodge (Lighten) the Image
- Get the Dodge Tool. In the Tool Options Bar, set the Brush size to 500 px, the Range to Midtones, and the Exposure to 50%.
- Place the middle of the brush at the top of the moon. Click and drag the cursor along the inside edge of the moon to add a highlight. I wanted a stronger highlight, so repeated the action.
TIPS:
- I chose a brush size of 500 px for my image, but the brush size will vary based upon the size of the area you are working on. (The default should be a soft-round brush, which is what you need.)
- If you want to affect the Highlights of an image, you may choose Highlights as your Range; and if you want to affect the Shadows on your image you may choose Shadows. Those choices usually result in a much stronger effect, so I prefer to leave the setting at Midtones and make adjustments as needed.
- An exposure of 50% will provide a moderate effect, and is a good place to start. If the effect is too strong, Ctrl Z (Mac: Cmd Z) to Undo, reduce the Exposure, and try again. If the effect is too light, you can Undo, and increase the Exposure or just brush over the image again (which is what I did on my moon).
I’ve added a light gray background to my image to make it easier to see what is happening.
Step 4: Burn (Darken) the Image
- Get the Burn Tool. I will leave the settings the same as I had them set for use with the Dodge tool.
- Starting at the tip of the moon as before, click and drag the cursor along the outside edge of the moon to Burn, or darken, the edge.
Only one pass was necessary to create the look I wanted on the moon. And, I think this looks great.
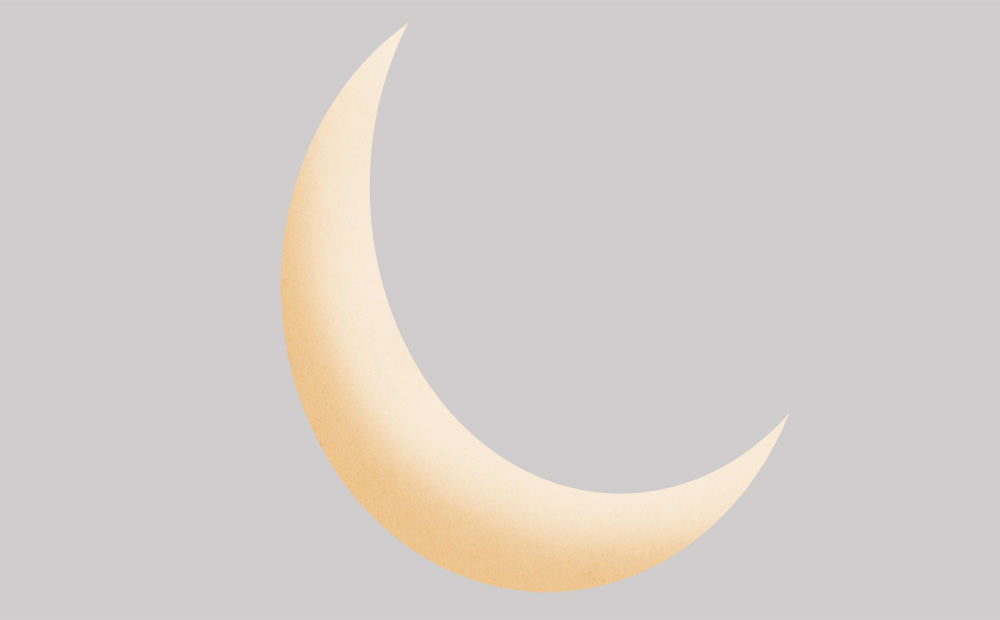

Not only have the Dodge and Burn Tools allowed us to create a really nice effect on the moon, but because we added an additional gray-scale layer to work on, we have also been able to make changes to our image non-destructively.
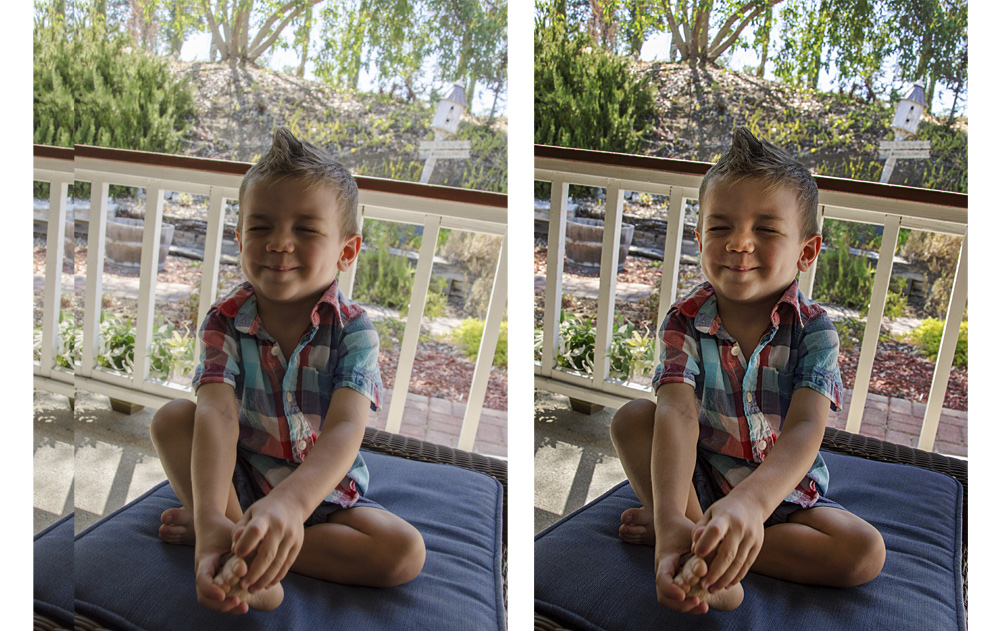
Although I demonstrated this technique on an element, it works exactly the same on photographs. There’s a whole lot wrong with this image, but Dodging and Burning, non-destructively, of course, helps it a lot.
Next time you have an over- or under-exposed image, or want to make adjustments to a scrapbook element, experiment with the Dodge and Burn tools. And don’t forget to work non-destructively.
If you would like to download a PDF of this tutorial you may do so here: How to Use the Dodge and Burn Tools, and Use them Non-Destructively.
Please join us in the Tips & Tricks Challenge and share your work!
Beautiful Work!! I love it!
Thanks, Linda. I hope you enjoy using these tools.
Thanks! I need to use these tools more to edit my photos.
Hi Cheryl, Yes, a quick and easy way to fix some photos. Try easy first, and if that doesn’t work, move on to other tools. 🙂
Thanks Karen! Great tutorial and a good reminder to use these tools on photos – I always forget about Dodge and Burn.
Thanks, Renee. I’m wondering if we have forgotten Dodge and Burn because they work destructively, so we have avoided them. But using them non-destructively, as I show you in the tutorial, will make them valuable again, I think.
Thank you for this great tutorial Karen! I will definitely find it very useful to easily edit my photos.
You’re welcome, Lidia. I’m glad you will find it helpful!
Great tut and very informative! I did learn a few things I didn’t know.
Thanks, Norma. I’m glad you found it helpful!
I’m in awe of how using these tools can make a layout pop!! Looking forward to your next tuts!!
So glad you’ve found the tutorial helpful!