How to Replace the Color of an Object in Photoshop
Learn how to use the Color Replacement Tool in Photoshop to make quick and easy color adjustments.
by Karen Schulz
One of the things I love about Photoshop is that it gives us so many ways to accomplish one task. For example, to change the color of an object, we can use a Hue-Saturation Adjustment, Match Color, Color Range, Color Overlays, Gradient Maps – and I would imagine there are ways I’ve yet to learn.
One more method of changing the color of an object is by using the Color Replacement Tool. This isn’t always the best method for all images, but it’s quick and easy, therefore, a good First Try.
What is the Purpose of the Color Replacement Tool?
The Color Replacement Tool allows us to paint over a specific color that we want to change in an image.
Where is the Color Replacement Tool Located?
The Color Replacement Tool is nested with the Brush Tool.
- In Photoshop Elements, click on the Brush Tool to select it. Open the Tool Options, and you will see the Color Replacement Tool in the Brush options. (3rd icon). Click on it to select it.
- In Photoshop, right-click on the tiny triangle by the Brush Tool to open the Fly-Out and choose Color Replacement Tool.
Is the Color Replacement Tool Destructive?
YES! The Color Replacement Tool will replace the pixels in your original image, thus making it a destructive adjustment. Always work on a duplicate of your image when working with this tool.
How Do I Use the Color Replacement Tool?
- Select the Color Replacement Tool.
- Choose a Brush and Brush Size, according to the size needed for the image upon which you will work. (The Default is a hard-edged round brush, which usually works just fine. Sometimes I like to work with a soft-edged round brush. More on that later.)
- Set the Tolerance to around 30%.
- Set the Mode to Color.
- Check Contiguous, Continuous, and Anti-Aliasing.
- Click on the Color Chips to open the Color Picker. Select your preferred color, the color that you will use to replace an unwanted color. Click OK.
- Click on the unwanted color in your image and drag your brush to recolor. Keep the cross-hair you see within the brush on the unwanted color.
Example 1: Changing the Color of a Solid Color Element
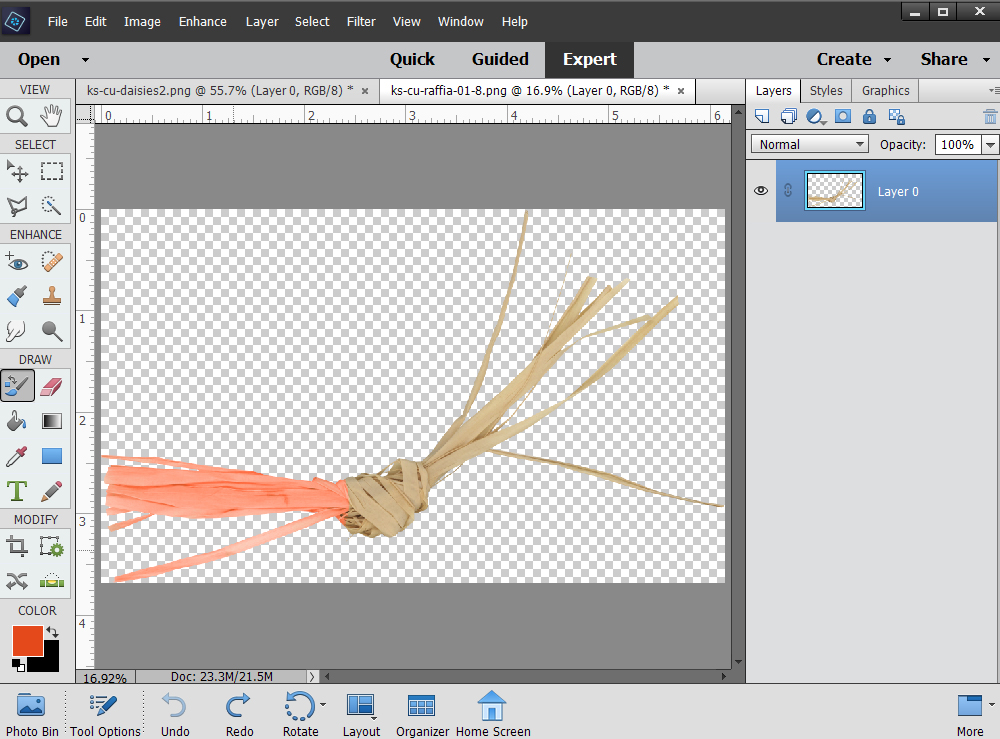
When changing the color of an element that has a solid color, using a hard-edge brush works just fine. In this example, I chose to change the color of a natural raffia piece to orange. After selecting the Orange in the Color Picker, I clicked down once on the raffia, then while holding down my left mouse button, I dragged the brush on the raffia, painting in the orange color. Quick and easy!
Example 2: Changing the Color an Element That Contains Multiple Colors (And Changing to a Soft-Edged Brush)
Have you ever found a multi-colored element that you loved, but wanted just one of the colors to be different? Start with the Color Replacement Tool and see if it works for you.
Here’s a sweet little cluster, but I want to use it on a paper that has some purple in it. I would like the replace the peach color in the 4-leaf clover with a purple that I sampled from the paper. I want a little of the peach to still be visible, so this is a time when I will use a soft-edged brush. That will allow a soft transition from the new purple color to the peach.
- In Photoshop Elements: With the Color Replacement Tool selected, in the Tool Options, click on Brush Settings. Reduce the Hardness of the brush to 0%.
- In Photoshop, in the Menu Bar, choose a soft-edged round brush.
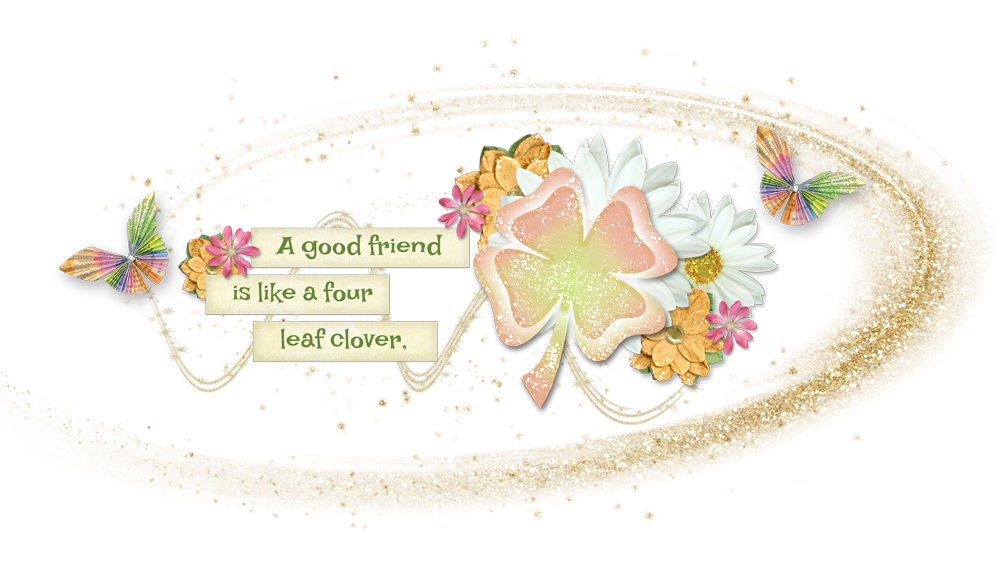
Place the crosshair that is in the middle of the brush along the inside edge of the shamrock, clicking on the peach color. I wanted to leave a little of the peach color on the shamrock so as well as switching to a soft-edged brush, I reduced the brush size to 200 px for this image. Drag around the edge of the shamrock until you are happy with your result. (I also added just a tiny dot of white paint, using a soft-edged brush, in the middle of the clover just to brighten it up a bit.)

Example 3: Changing the Color of an Element That Contains Multiple Colors (And Reducing Tolerance)
How many times have you wanted to use a piece of graffiti that had just one color in it you didn’t want? The Color Replacement Tool can help with this too. Let’s replace just the red with purple in this piece of graffiti.
With pieces such as this, that have multiple and blended colors, it works best to experiment with Tolerance levels. For this piece, I enlarged my brush size to 1000 px, reduced the Tolerance to 22%, opened the Color Picker and chose the purple color I wanted, and then painted over the entire piece. Because the Tolerance was set so low, it didn’t affect the green and orange colors – so using a larger brush makes the work go faster. Do you notice there is still a little red in the image, especially in the lower right area? If I wanted to totally remove that red, I would need to increase the Tolerance and go over that area again. But I like it, so am going to leave it as it is.

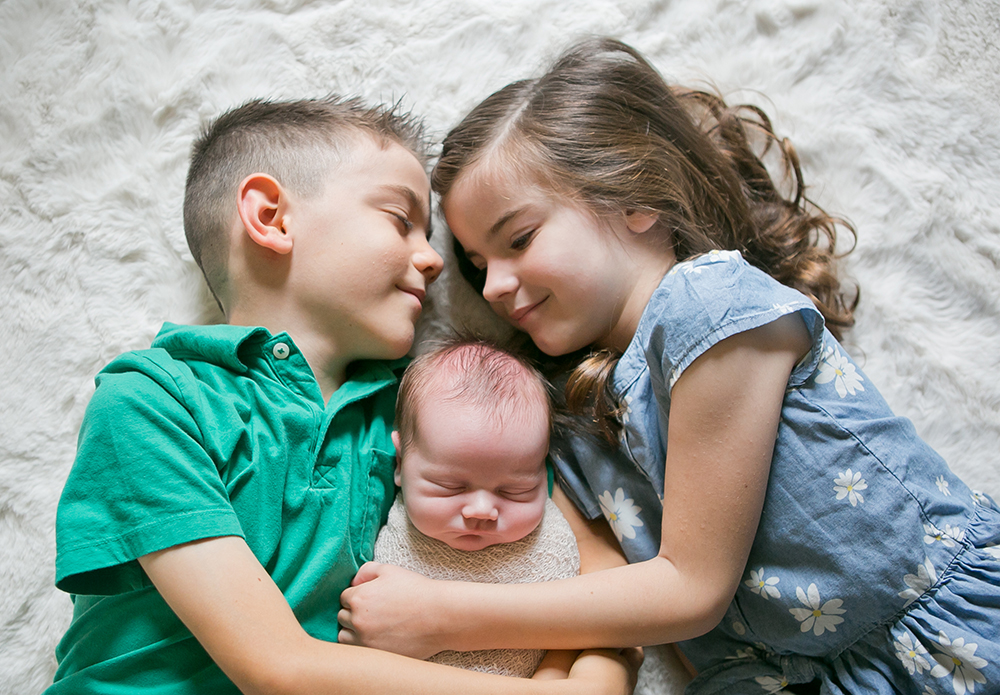
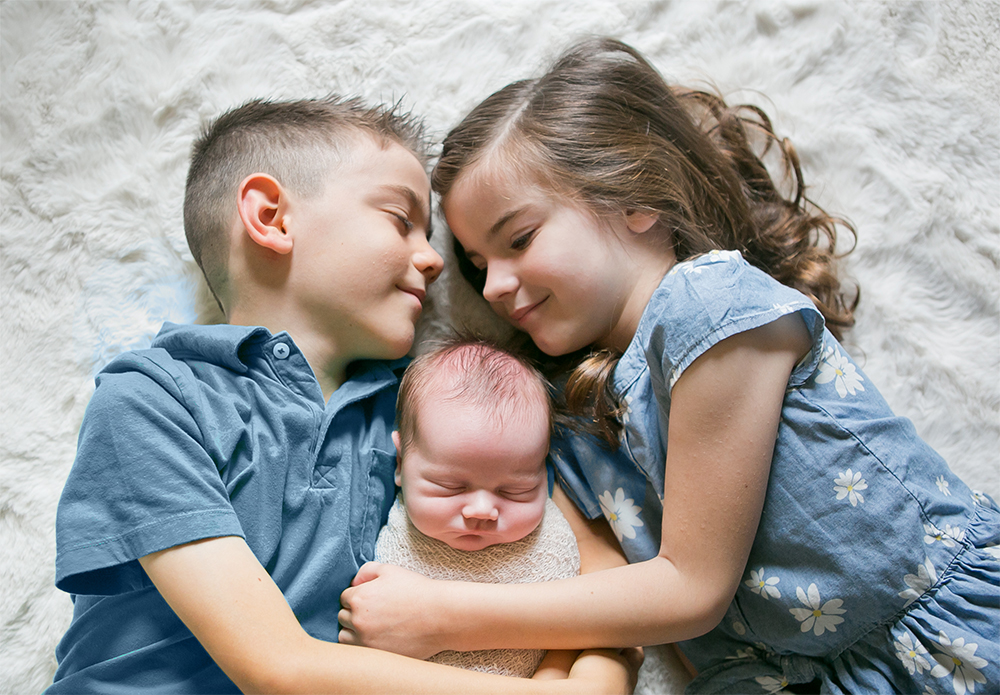
Example 4: Using the Color Replacement Tool on a Photograph
Changing the colors in a photograph with the Color Replacement Tool works exactly the same way as it does with other objects. You might want to change the color in a photo to give it a color pop, or to make items coordinate with one another.
In this image, I chose to change the color of the little boy’s green shirt to match the color of his sister’s dress.
Final Thoughts:
- The Color Replacement Tool is a quick and easy First Try.
- Although it doesn’t always work with every image, it’s great when it does work!
- If you are having trouble getting the results you want, experiment with brush size, brush softness/hardness, and Tolerance.
- If your efforts aren’t giving you the results you want, try a different recoloring method.
Show your Stuff!
Join me in the March Tips & Tricks Challenge where you can show the results you achieved using the Color Replacement Tool.
A How to Replace the Color of an Object in Photoshop PDF is available for those who want to save a copy.
Credits:
Raffia: Raffia 01
Cluster: This is Me March Gift
Graffiti: This is Me March Kit
Photograph: Angela Chandler Photography
This tutorial is fabulous!!! How did I not know about the colour change tool? Thank you SO much. There have been many, many time when I have wanted to change the colour of something and now I know how to do that easily. Thank you very much.
I’m so glad this was helpful for you!
This looks great I have always wanted to know how to change colours so they look real