Sketchy Photos – How To

This is such a fun technique! Now, keep in mind that I am a self-taught Photoshop user. Therefore, there may be an easier way to achieve this look. It’s certianly not difficult by any means, but there may be some double-secret button somewhere that does this automatically that I don’t know about. hahaha. But never-the-less, I’ll take you step by step through my process. I used Photoshop CS5 to create this page, so CS2, 3, or 4 should be strikingly similar. However, if you use Photoshop Elements, some of the navigation (and features) may be different. I used to be able to guide others through it based on memory from my PSE days, but the last version of PSE I used was PSE4! It has come a long way since then and looks completely different, so unfortunately, I may not be of much help there. At any rate… let’s dive in, shall we?
***click on any image for a larger view***
1.) Open a new document in Photoshop and place your desired photo on the canvas. Make sure your photo layer is active.

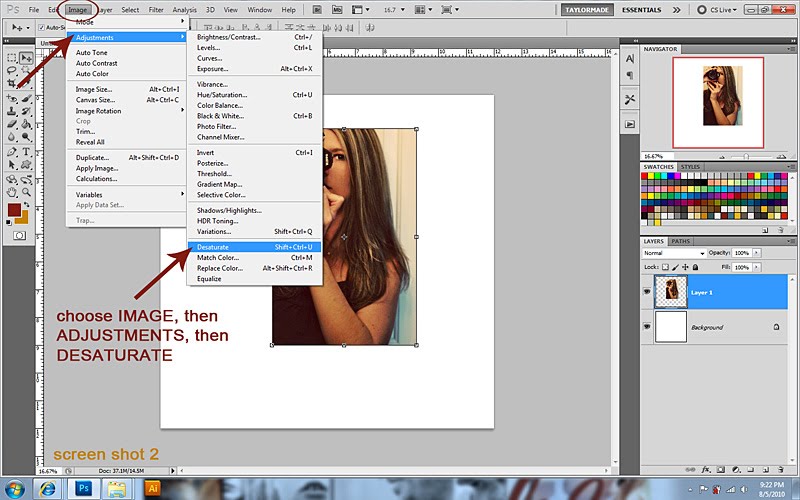
2.) Desaturate your photo. (Otherwise, the image will not be black, but bright yellow and orange. You can leave it like that if you wish, but I liked the look and feel of the black much better for my page.)
3.) Now let’s add a Layer Mask to our photo layer. (I do this instead of erasing to keep the image in tact in case I mess up… which is a lot.)

4.) Choose your Brush tool and settings as follows to prepare for using your layer mask.

5.) Now we need to change our foreground color to black. (Remember… with layer masks, if you paint “black” onto the mask, it hides that part of the photo… if you paint “white” onto the mask, it brings it back.)

6.) Before we begin covering up part of our photo, make sure you click on the white square on your photo layer. Otherwise, you’ll end up with a bunch of black paint on your photo.

7.) Now begin “painting” over the parts of your photo that you want to hide (ie, the background). There’s no need to be “perfect”… you just want the majority of the background gone. Just be sure not to erase any of the “person” in your photo. 🙂

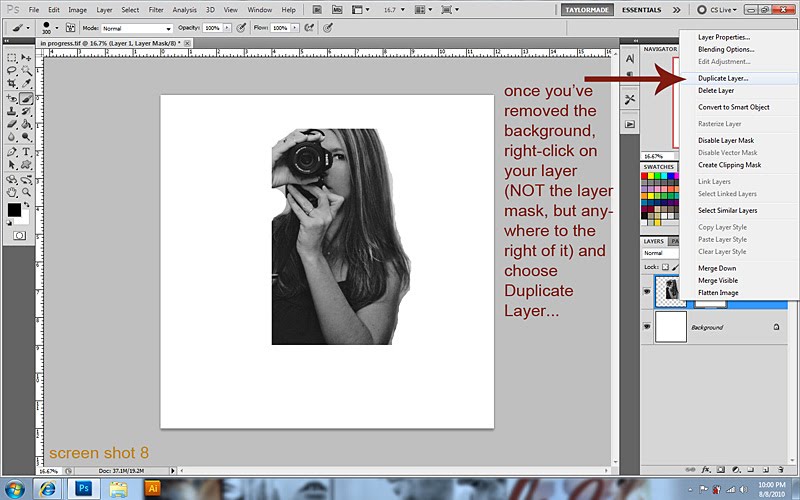
8.) Now let’s duplicate our layer…
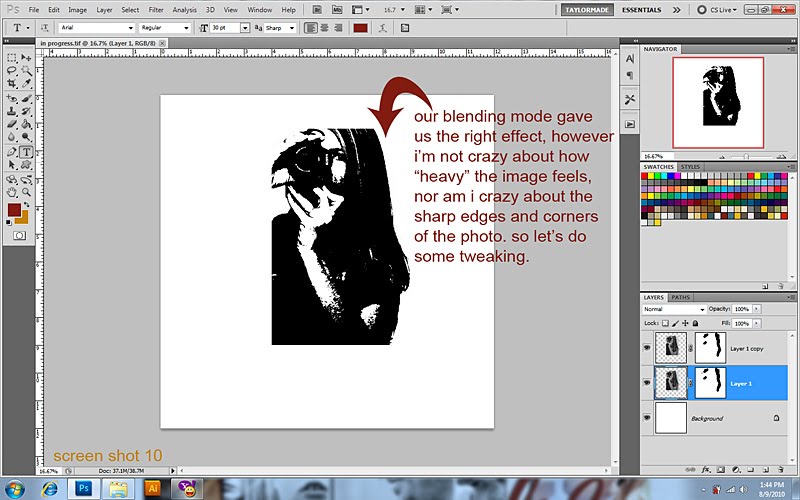
9.) Change the Blending Mode of your duplicated layer to “Hard Mix”.

10.) This is where our image begins to transform. There is still some work needed, but it gives us our starting point.
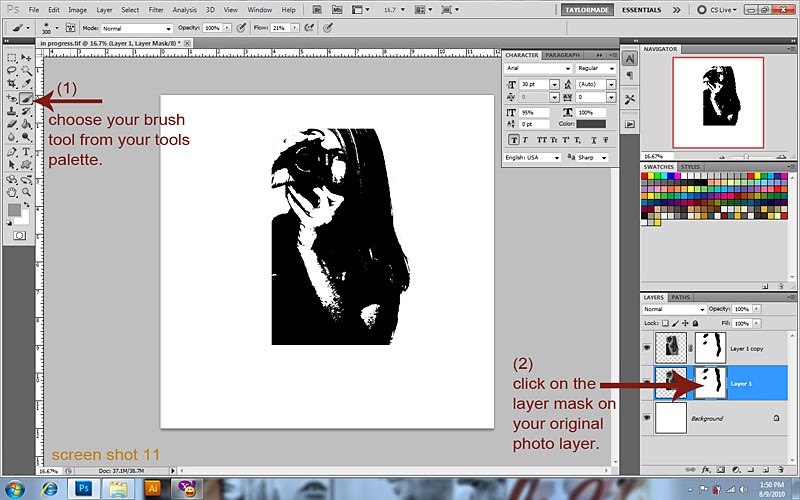
11.) Choose your Brush Tool from your tools palette and then click on the layer mask on your original photo layer.
12.) Now let’s change our foreground color to a medium grey. (The lighter the grey, the “less” of the photo it will hide… the darker, the more it will hide.)

13.) Now choose a soft, round brush by right-clicking anywhere on your canvas.

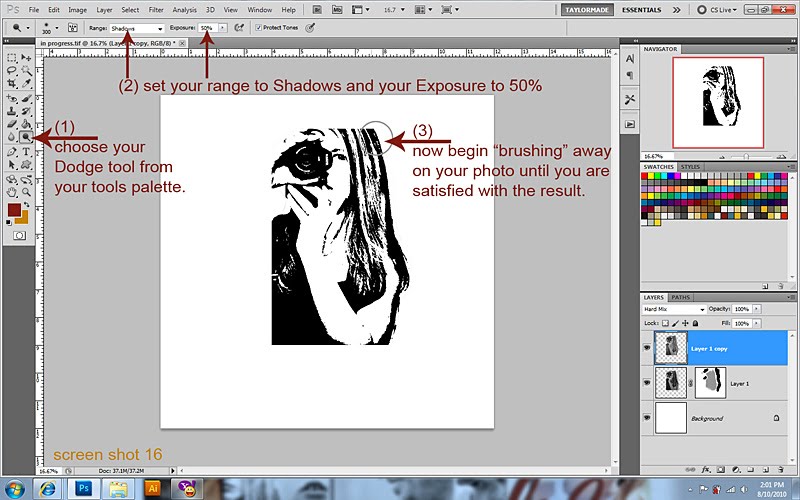
14.) Now begin brushing away on your photo to let some of the highlights shine through.

15.) If you need more highlights showing through on your photo, let’s do some work on the duplicated layer. Start by right-clicking on the layer mask and choosing Apply Layer Mask. (This will allow your photo to now take the shape of your layer mask.)

16.) Once you’ve merged your photo with its layer mask, choose your Dodge Tool from your tools palette and adjust your settings as follows:
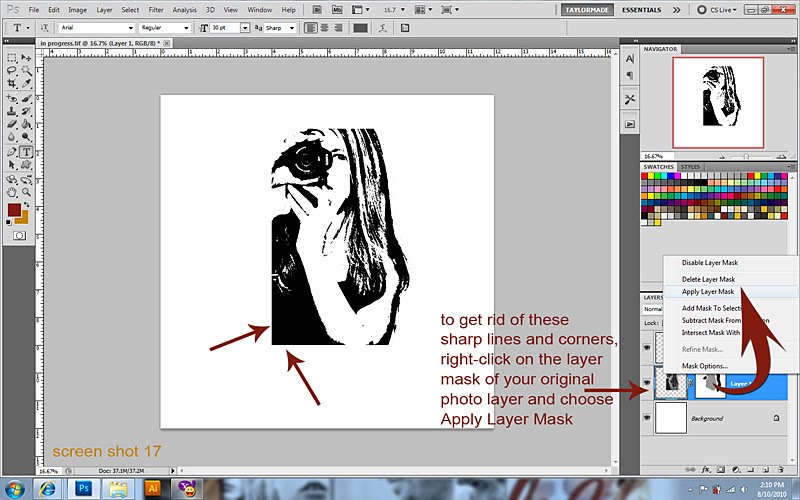
17.) Now that we’re happy with the amount of highlights showing through, let’s get rid of these sharp lines and corners on our photo. Start by applying the layer mask on your original photo layer. (i know… it seems a little tedious… i just sort of “documented” the steps as i went. hahaha)
18.) Now we’ll add a NEW layer mask to our photo layer and choose black as our foreground color.

19.) Making sure your Brush Tool is still activated, adjust your settings as follows and begin brushing away the sharp edges.

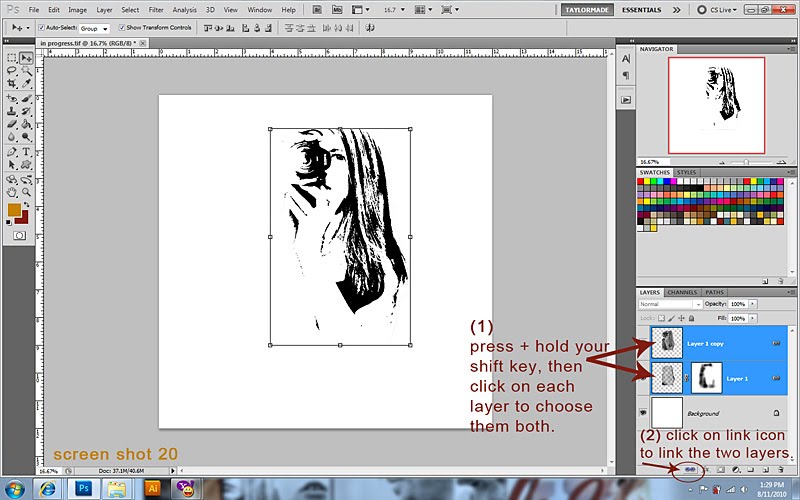
20.) Once you’re happy with the results, let’s link our layers. I would have thought I could just merge the 2 layers into one layer, but apparently, Photoshop has a quirk about merging layers that have blending modes on them. So when I tried to merge them, this is what I got…

Ewww. Yeah… no… not the look I was going for. Now, I did find a way around it, but I’m certain there’s a lower maintenance way to do it. But for now… we’ll just do it the long “taylormade” way. hahahaha!)
So, as I was saying… let’s “LINK” our layers. 🙂
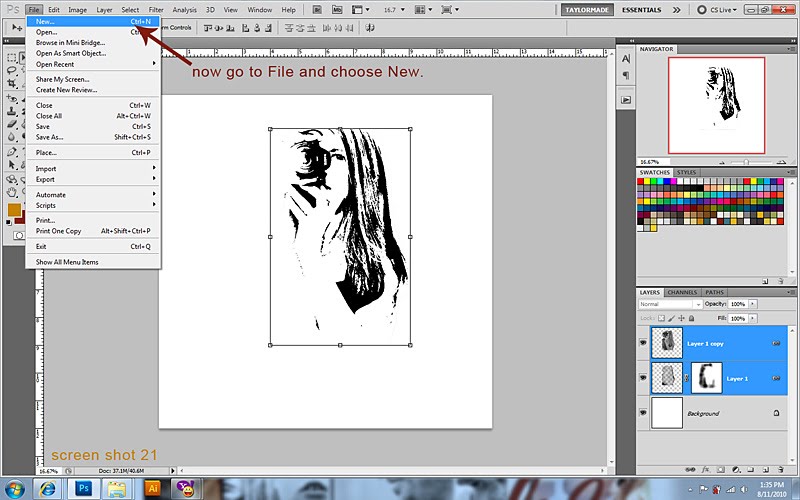
21.) Now go to File and open a New Document.
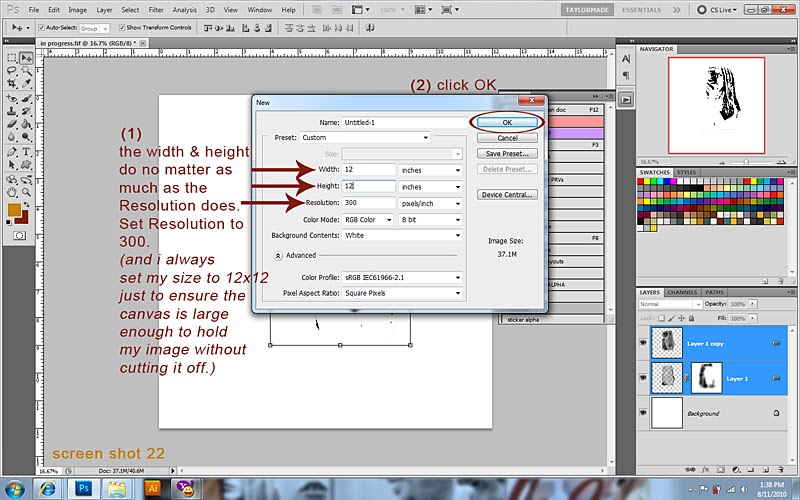
22.) Just for sake of good habit, let’s set the size to 12×12, 300dpi.
23.) Now go to Window, Arrange, Tile. This allows us to see both documents at the same time.

24.) Now just drag your photo onto your new document.

25.) Make sure you are on your NEW document by clicking on it. Then, go to Layers, Flatten Image. (For some reason, flattening an image allows it to keep it’s blending modes in tact. yaay!)

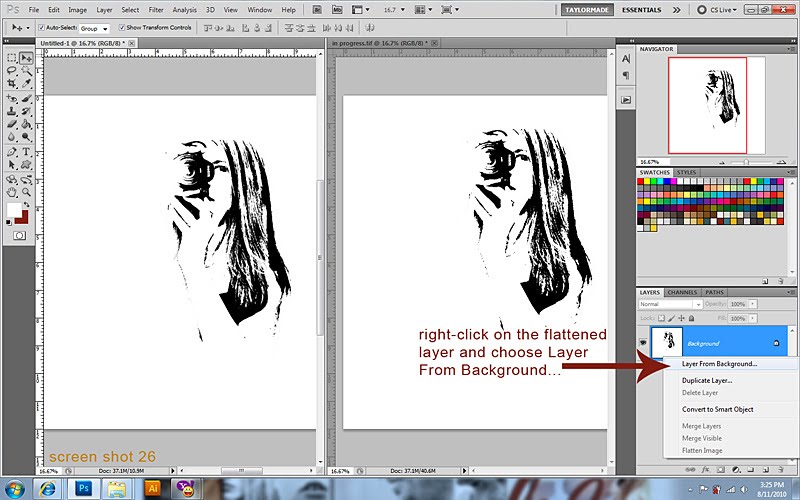
26.) Still on your NEW document, right-click on your one flattened layer and choose “Layer From Background”. (This simply unlocks your “background” layer so you can edit it.)
27.) Now go to Select and choose Color Range.

28.) We want to take out all of the white from our image now so that we’re left with only our “sketched” photo. So now just click any where on the “white” on your canvas. You should then see your image in the little preview window for color range.

29.) Once you click OK, you will then see “marching ants” around your entire canvas and outlining your image.

30.) Now simply hit Delete on your keyboard and all of the white should disappear, leaving you with just your sketched image.

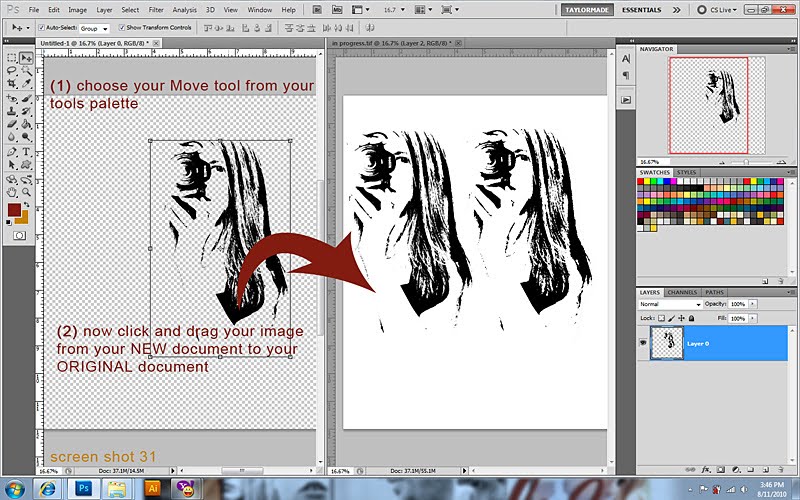
31.) Now drag the image from your new document back over to your original canvas. (My GOODNESS I feel like I’m talking in circles! hahaha)
32.) Now you can close your “new” document. You can save it if you wish… juuuussssst in case. 🙂

33.) Now you can delete the 2 linked layers… you won’t be needing those anymore. 🙂

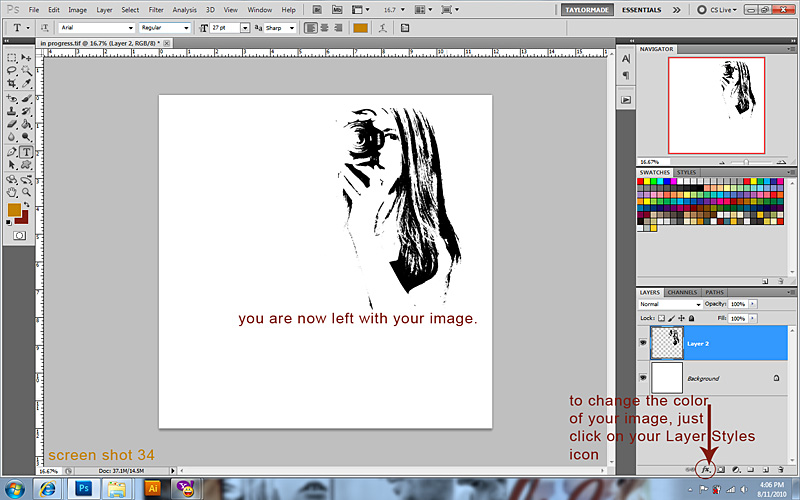
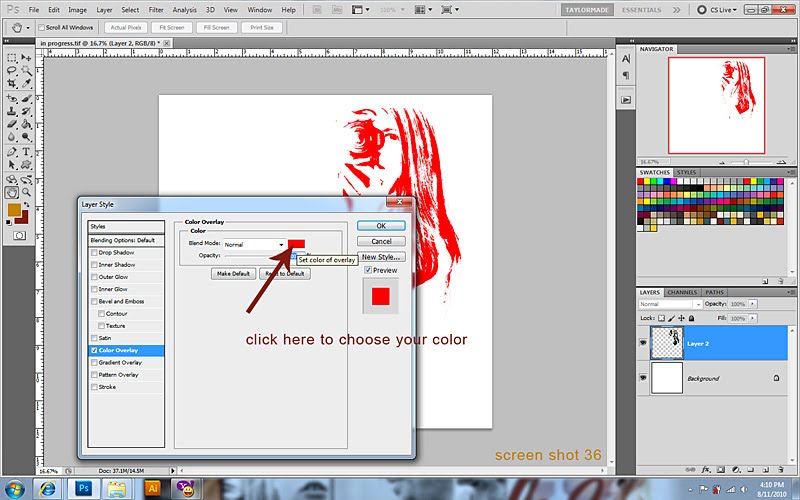
34.) You are now left with your sketched image. Want to change the color of it? It’s super easy… just click on your Layer Styles icon at the bottom of your layers palette.
35.) Choose Color Overlay…

36.) Click on the color square to choose your color…
37.) Choose your color here…
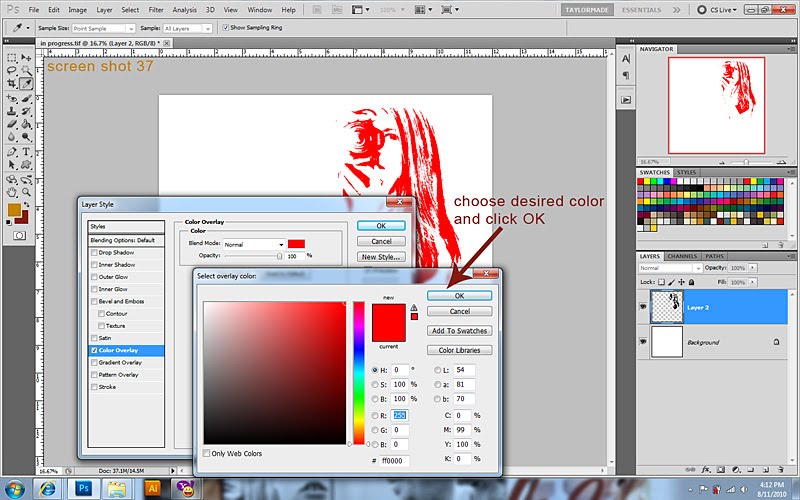
38.) I chose a dark grey for mine, but you can choose any color you wish.

39.) Now move onto scrapping your image. I kept going and did one for everyone in the family. 🙂 Here is finished layout…

I would love to hear what you think of this tutorial! Feel free to leave comments! 🙂 I would also love to SEE what you create using these techniques, so leave us a link in your comment if you like! 🙂
And as always, please feel free to email me if you have any questions or if you get stuck, ok?
Very creative! It seems like a great way to use less-than-perfect photos. I am going to bookmark the page and try it myself. Thanks!