
All members that participate, can everyone PLEASE ensure that you read all the rules for this challenge
so that you can claim your challenge points. Thank you!

Hi everyone, Ona here to host May's Creative Photo Editing challenge. Hope you are all doing well! While everyone in the northern hemisphere is welcoming Spring, down here in the south we are in the throes of Autumn (which I love), but not looking forward the rainy winter season on the horizon!

This month I thought I would share with you a very simple and effective technique you can use to edit your photos to give them a vintage/distressed feel to them. As you can see below, this technique only needs one frame, paper and one (optional) stamp. It's also a technique that I think people that don't use Photoshop CC would be able to replicate as well.
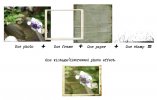
Photo - My own; Frame - A Great Day Elements | Vicki Stegall; Paper - Color Crush 2 | Joyful Heart Designs;
Stamp - And So Here I Stand | Rachel Jefferies
Stamp - And So Here I Stand | Rachel Jefferies
Process Steps:
1. After finding a frame to use, I created a mat behind the photo to clip my photo to and then resized the photo accordingly. I then merged the photo, photo mat and frame together to create one layer.
(TIP: It's always a good idea to include your photo frame in the distressing stage as the finished photo will then look more 'natural'. The problem with distressing the photo first and then placing it a frame is that it could look out of place, ie. creased old photo in a smooth newish frame. It also helps to find a vintage style frame as well.)
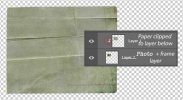
2. Next I looked for some paper to use as an overlay. I particularly liked the messy creased lines in Jenn's Color Crush 2 paper. While you can use the entire paper and resize it down, I chose to just cut out the creased section of the paper.
I placed the paper above the photo layer and changed the blend mode to Hard Light and kept the Opacity to 100%. This is something that you need to play around with as each paper and photo combination is going to give you a different result.
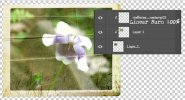
3. I also came across a stamp that I wanted to use, to distress the framed photo just a bit more. I placed the stamp above the paper layer and positioned it at the bottom of the frame, resized it, then clipped it to paper layer below it.
I also changed the colour of it as the black was a bit too stark. In the Image>Adjustments>Hue/Saturation dialogue box I selected a sepia tone and then used the Lightness slider to make it a bit lighter in colour. After clicking OK to those settings, on the stamp layer I changed the blend mode to Linear Burn and kept the Opacity at 100%.
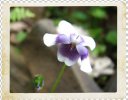
All done!
Tip: When selecting your paper, if the colour of it affects your photo, you can always desaturate the paper by using SHIFT+CTRL+U or go to the Image>Adjustments>Hue/Saturation dialogue box and move the Saturation slider all the way over to the left, removing all the colour.
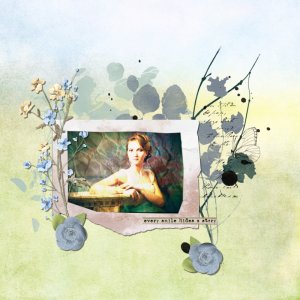
Here is my page with my vintage/distressed photo.
Note on challenge requirements:
This challenge is about using a paper (plus optional stamps or brushes) to give your photo a vintage/distressed feel to it. This type of effect can also be created by using actions, styles, overlays etc but for this challenge please only use those items that I have mentioned above. Challenges are all about getting out of our comfort zones so please join in with the spirit of the challenge.

If you have any questions then please go ahead and ask.

RULES:
- Use at least one paper on your photo to give it a vintage/distressed look to it.
- Let me know in the thread which paper you used and why you chose it.
- Please read the 'Note on challenge requirement' to clarify what you can use to distress your photo.
- Please use 80% Oscraps products that are currently in the store.
- Non-Oscraps products or retired O designer products can be used whether the designer is selling elsewhere or not.
- You need to credit all the products used on your layout.
- Your layout can not be used for more than one challenge.
- Your page must be posted in the Challenge 2 gallery by midnight PST May 31, 2024 and linked back to this thread (see below on how to add your linked layout).
- And do not forget to update the CURRENT MONTH'S TRACKING THREAD to be eligible for your coupon.
Adding a linked layout from the Gallery to a thread:
1. Upload your layout to the gallery first. In your forum post click the Gallery Embed icon (little camera).
2. This will open your gallery, simply click on the layout you require, then scroll down to the bottom of the screen and click the Continue button.
3. Your linked layout is now in your post, the image will appear once you have clicked the Post Reply button.
Last edited:
 , you are welcome, and looking forward to seeing your layout!




 you are all hitting this challenge out of the ball park, your layouts have been AMAZING!!!
