Hi there, you are in the right spot!

1. Saving PSD file and flattening all the layers.
Okay, so after you
save your psd file in Photoshop, I would suggest using the CTRL+SHIFT+ALT+E key combination to flatten your layout, just click on the top layer in your layers panel before holding down all of those keys together (I normally press the Control, Shift and Alt keys down first with one hand and press the E key)...... but make sure that you have saved your psd file first, just in case you need to come back to it.
The key combination I mentioned is the best way of merging all your layers so that the look of your layout is not changed in any way. Do not highlight the layers first and use CTRL+J, as it gives a different result in the look of your page.

2. Saving the flattened file as a jpg
Now you need to save this flattened file as a jpg - this is your full resolution 300dpi 12"x12" (3600px x 3600px) file, the one you can use print from if you are wanting to create a printed photobook.
3. Resize the full resolution jpg file
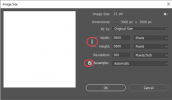
Next, go to the Image menu>Image size - when this dialogue box opens you will see your layout's current measurements. Make sure that the two symbols I have circled as shown (the chain at the top allows you to only make one change to a measure and the other one will be automatically changed to keep it in ratio), the Resample box should also be ticked.
As mentioned above, the this resolution and size is great for printing out but you need to make the layout smaller for use on the web. You can resize your layout to either 600x600px or 800x800px. Just click on either the Width or Height and change it to one of those measurements. 600 x 600px used to be the standard and lots of people still use this, however the 800 x 800px has become popular over the last of years as well but it is your choice.
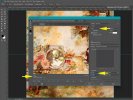
Once you change one of the measurements and click the OK. After a couple of seconds you will see your smaller layout.
View attachment 447074
4. Saving your web sized file
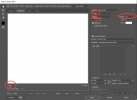
For this step, click on the File menu and go to Export > Save for Web (Legacy).
Check that JPEG is in the box and not PNG. To get a file to sit underneath the 250kb mark, use the Quality slider (click on the little down arrow to get to the slider), clicking and holding the mouse down as you slide to the right or left. The corresponding size will be shown at the bottom left under the JPEG heading (circled). Try to keep the number within the Medium (or higher) whenever possible...... do not drop below to Low area otherwise your layout will not look good screen as it will be very grainy and/or blurry.
If you used the 600x600 measurement in your last step then you shouldn't have too much problem in keeping your file under the 250kb and Medium setting. Next you need to save this file. Just like the normal Save the program you can navigate to where you want to save it.
View attachment 447075
So at this point you have 1 x PSD file, 1 x Full resolution JPG, and 1 x Web file.
Whether you want to keep all three files is up to, it depends on how much storage space you have on your pc etc.
Some people delete their PSD files, other like to keep them; then there are those that keep their PSD file and their Full resolution files and delete the web version after they have uploaded it to the web. Keeping the full resolution file gives you the option of printing it if you are wanting to do that and of course you can always create another web version file if you wanted to delete the one you uploaded. There is no right or wrong way, it all just depends on your own way of doing things.

Doing it this way will also help with your layout resolution. Creating and emailing it to yourself as you mentioned would also cause some resolution loss to your jpeg file so you may see a difference in your layouts if you save and create all your files in Photoshop.
Please let me know if you have any questions, only too happy to help.


 So happy to hear that!! If you need a hand with anything else then just start another new thread in this section and I, or whoever is around, will certainly give you a helping hand.