Oscraps

How to blend a photo in a brush (not a mask)

sandra-9663

Well-Known Member
Hi, I'm looking at the Challenge #2 for this month.
One of the rules is: blend a photo in a brush (not a mask).
I googled it, but couldn't find any help.
Does anyone have a link to a tutorial, or an easy "how to".?
Thanks for any help!!
Sandra
(I'm using PS2022, Windows 11)
 

wombat146

ONA - Administrator
CHEERY O
Hi, I'm looking at the Challenge #2 for this month.
One of the rules is: blend a photo in a brush (not a mask).
I googled it, but couldn't find any help.
Does anyone have a link to a tutorial, or an easy "how to".?
Thanks for any help!!
Sandra
(I'm using PS2022, Windows 11)
Sandra, do you know how to use a layer mask?
If so, on your photo layer, click the mask icon, it should be white.......... this is called a Show All mask.
Now, with brush, using black, and using a lowish opacity, click around the edges of the photos.
You can actually turn the opacity up high (80%) and just do the edges first, then lower the opacity and keeping clicking away to soften the photo edge as you move in towards the center of your photo, keeping the focus of your photo un-blended.

The idea is soften the photo edges so they blend into the background paper, so that just the main part of the photo, say a face, is the important part that is showing, without the background clutter.

I can put together a more detailed step by step tutorial if you like but can't post it until tomorrow as it pretty late for me down here. :)
 

timounette

Well-Known Member
CHEERY O
Just use the brush as a mask.
I just wanted to show you that it allowed you to use the brushes in a different way and to blend the photos into original shapes.
 

Betty Jo

♥ Lovin' the O ♥
CHEERY O
Sandra, do you know how to use a layer mask?
If so, on your photo layer, click the mask icon, it should be white.......... this is called a Show All mask.
Now, with brush, using black, and using a lowish opacity, click around the edges of the photos.
You can actually turn the opacity up high (80%) and just do the edges first, then lower the opacity and keeping clicking away to soften the photo edge as you move in towards the center of your photo, keeping the focus of your photo un-blended.

The idea is soften the photo edges so they blend into the background paper, so that just the main part of the photo, say a face, is the important part that is showing, without the background clutter.

I can put together a more detailed step by step tutorial if you like but can't post it until tomorrow as it pretty late for me down here. :)
A tutorial for this, when you have the time, Ona, would be awesome. ♥
 

wombat146

ONA - Administrator
CHEERY O
Just use the brush as a mask.
I just wanted to show you that it allowed you to use the brushes in a different way and to blend the photos into original shapes.
ahh, okay Sandrine, I told Sandra the wrong steps then. lol!!! okay will post again.
 

wombat146

ONA - Administrator
CHEERY O
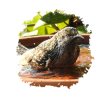
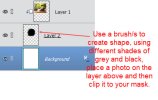
@sandra-9663 Sorry Sandra, I might have confused you. So what Sandrine need you to do is use the brush to create a mask of your own which is a real fun thing to do actually! On a new layer, using various brushes (or use the same one but turn it around so you stamp it in different directions), just click away to create a shape of some sort.......... these are fun with different types of brushes, (or png files) so they can be flowers, doodles, paint splats etc.
When you have a nice little shape you are happy with, move a photo above your new shape mask and then clip the photo to it using CTRL + G like you would normally. :)

This is VERY ROUGH screen shot of one I just did in an old Elements program as Photoshop takes too long to open! lol!!

1662041697742.jpeg1662041764453.jpeg
 
Last edited:

sandra-9663

Well-Known Member
Thanks, Everyone!!
I understand now!!
Ona, I love your first reply, because I've done that method in the past, and I love the way it works.
I'll go play with my brushes and clip a photo to some different ones, just to learn how.
I think I was making this more difficult than it actually is. I thought I had to turn a photo into a brush somehow.
I love learning new things in Photoshop!!
Sandra
 
Top