Hello everyone, welcome to NBK's November Showcase Challenge with a 50% Sale off all STORYBOOK TEMPLATES My goodness, just checked the sale out and there are Storybook templates for as low as $2!!!! Fabulous time to stock up!!
")
The Showcase Product Challenge for November will focus Storybook templates in conjunction with some Extraction work!
Now don't go running away!
Extractions do not need to be hard! In the true sense of the word, Extraction means that you are are taking something out of the photo but I am using the term a bit more loosely here, meaning that you want to focus on just one part of the photo only, which can be done a few different ways.Here is a double page I made of my eldest granddaughter Grace (who turned 15 just last Friday!). I decided to go with three photos to show you how you can focus/extract in three different ways.

Credits: Spring Break Storybook Mini| Spring Break Art N' Shadows Frame Templates| Spring Break Papers - Solids| Grannys Garden ABP1| Art and Journal Inky Flowers| Focus WA| Remarkable ABP-No1| Re-invent-ABP2| Re-invent-ABP1http://www.oscraps.com/shop/re-invent-Megabundle-ABP1.html
The three different ways I have used are 1) using a clipping mask (b&w photo); 2) using a blend mode for the large photo and 3) Using the Quick Selection tool. In each instance I wanted to purely focus on Grace and her horse Cruz.
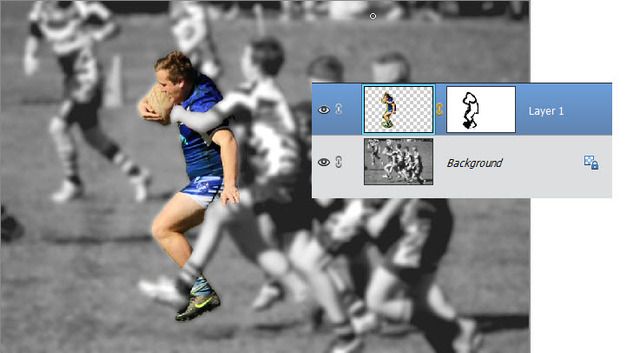
Using a Clipping Mask:
In my page I used the Art N' Shadow Template to create an-out-bounds effect within the frame. As you know, when using a clipping mask, whatever you place above the mask, be it a photo or paper etc. it will take on the shape of the mask after it is clipped.
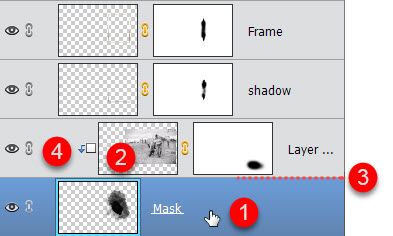
1. Move the Art N' Shadow psd file onto your page (you will need to keep all the layers together - if you need to, click the chain-link symbol to link them first)
2. Position the photo above the Mask layer
3. Use your mouse to hover between the photo and mask layers, hold down the ALT key and when the mouse cursor changes to a small circle-like symbol just click.
4. You can see that the photo layer is now clipped to the mask layer by the little down pointing arrow.
As you can see I added a mask to the frame layer and the drop shadow to customise it to my own liking.
TIP: If the mask itself is allowing too much of the background through, simply use a soft black brush directly on this layer. Just paint in the areas of the mask that needs to be a bit more solid. You can also do this if you need to extend the mask just that little bit but make sure to use a lower opacity brush so the edges are blended out and there are no solid outside lines.
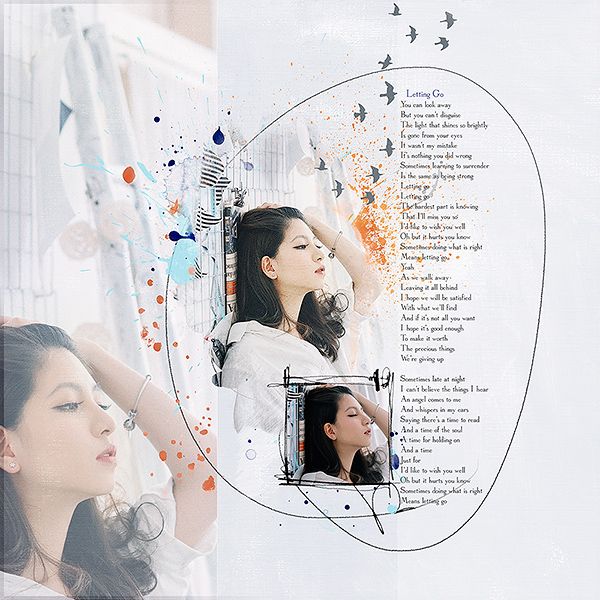
Using a Blend Mode:
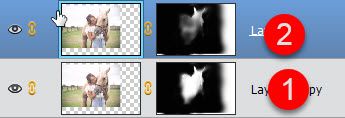
Play around with your Blend Modes to see what results you get for your photo. When you find one that works, apply a mask to it. Using a brush of your choice, paint with black to hide the areas of the photo you don't want to see. In the screen shot below you can see that I duplicated the layer. Both layers are Color Burn but the bottom layer is (1) 28% while the top is (2) 79%. Note that the masking is a bit different. I kept losing Cruz's ears! which is why I used two layers with the same blend but masked out the areas that were too dark in the top layer. Just play around until you are happy with your photo.
Using Quick Selection Tool:
When I want to cut something right out of the photo I go to the Quick Selection tool. There are other methods of extracting a photo outline but I tend to use the Quick Selection tool 9 out of 10 times. If you haven't used it before then I suggest you give it a try. It is quite an easy tool to use and of course, the more you use it, the more familiar it will become.
The Quick Selection tool is grouped with the Magic Wand and can be customised to suit your own needs but I am pretty basic and virtually only use the settings I have numbered here.

1. The Quick Selection tool
2. The Add and Subtract buttons
3. Size of brush
4. Refine edge
To use this tool:
Open the photo and select the Quick Selection tool
1. Make sure the ADD button is selected! Check your brush size. I normally start off with a large brush to fill in the large areas first. Just move your mouse over the main part of your photo, leaving the edges to last.

As you move your cursor (with the + sign) you will see marching ants appear, keep moving around the photo and start making your brush smaller as you select the areas towards the edge of the outline you want. Once you have done it a few times it really is very quick!
2. Of course you are going to select a little (or big part) of the photo by accident or the program can't distinguish between the photo and the background so you need to lower your brush size and zoom in. Use the subtract button to just push the selection back towards your photo outline.
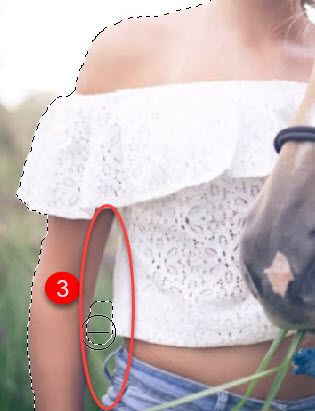
3. As you can see in the example above, I need to get rid of the areas between Grace's extended arm and her body so I used the subtract button and different brush sizes to gently push back to her body on one side and her arm on the other.
You will be constantly shifting between the add and subtract button.
4. When your photo outline is done you can use the Refine Edge button. I normally use the Smooth and Feather options, just playing with the settings until I am happy. As you can see there are other options but I honestly have not explored them very much.

5. When you have completed this, simply click OK to return to your psd file. Press CTRL+J to place your selection onto a new layer. Hide the original photo layer, if your new extraction needs a bit more work (like mine did), put a mask on the layer and use a small brush to lightly go around the edges, smoothing out any jagged spots. Remember to ZOOM in!

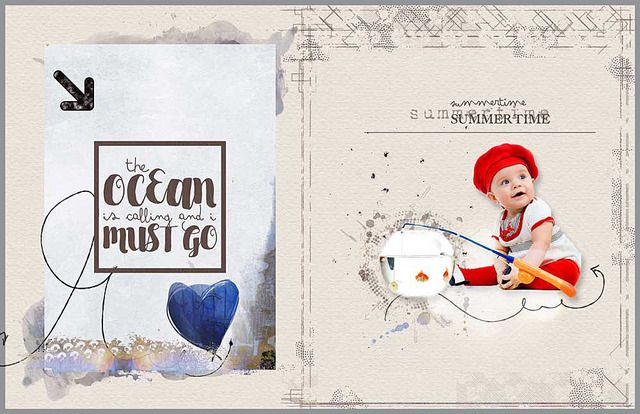
Using Selective Masking:
Another fun way to focus on just a part of the photo is to use the selective masking technique. This can be used to just select a particular colour as well.
1. Open your photo and use the Lasso tool to roughly draw around the part of the photo you want to keep in focus.
2. Once the outline has marching ants around it press CTRL+J to put the selection on a new layer.
3. Hide the selection layer.
4. On the original photo carry out the changes you want........ perhaps you just want to apply a Gaussian Blur etc.
5. In my example below I just wanted my grandson to stand out so I changed the original photo layer to B&W and I used a Gaussian Blur on it.
6. Unhide the top layer and apply a mask to it. Using a small, Soft Brush go around the subject using black to hide the parts you don't want. Remember to zoom in to get a closer look. The opacity of your brush will depend on whether you want a soft gradual blend or a sharp one.
So as you can see, there are quite a few ways of bringing focus to just one part of your photo!
As always I would like to share some inspiration pages from the the amazing NBK CT!
From Astrid:
From Marianne:
Prizes:
One lucky person will win a $5 coupon to NBK Design store.
PLUS one of 5 person with the most layouts in a month will go into the draw for a MONTHLY $10 coupon.
Rules:
• Scrap a page using a Storybook template with at least ONE photo using some type of EXTRACTION on it, as shown in the tutorial above..
• Layout needs to contain 75% of NBK Design products.
• Layouts need to be uploaded to NBK GALLERY by Sunday 20 November 2016 11.59 pm CST time.
• Layouts need to be linked back to this thread by Sunday 20 November 2016 11.59 pm CST time.
Last edited by a moderator:


