ArmyGrl
Well-Known Member
Hi all! First, let me say how blown away I am with the art journal and mixed media projects already shared here.... 
If you have used digital downloads in your art journals, or to craft an art journal, I'd love to see your work in this thread (or a link to an already established thread post).
I love to use digital downloads in my art journals. One thing I do is print embellishments or ephemera to use as a focal point, painting around the embellishment/ephemera.
Or, as in the project below, I use digital papers as the background and paint on top of those or use the papers to craft a journal.
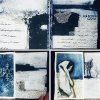
In my project below, I used A Whimsical Adventures Mixed Media Papers No 34 to craft a new winter themed art journal for 2024.
I designed my "book" in Photoshop first. I love the mixed media arty vibes of the digital papers and knew they could be stand alone pages with a few areas for me to record written thoughts and journaling. Thus, I decided to craft a journal that would have one have one side blank for my analog art and the other side filled with the digital paper. I am limited to standard print sizes such as A4 or US Letter Size and being in the US, letter size is common. So, I went with a 11"x8.5", horizontal spread. I printed on 110lb plain card stock from my home printer.
After stacking the printed pages together and folding in half (and trimming the edges), I applied washi tape to the spine (for no other reason than I love washi tape and it matched the colors). I used an awl to punch through the spine, then bound with threaded white embroidery floss. The top picture is the front and back cover. On the cover I stamped "Winter Came" using Ranger's Distress Archival Ink in Faded Jeans. To help it pop off the page, I outlined the top with a white charcoal pencil.
On the inside I have finished two spreads but have room for five more.
I used the same supplies for the snowflakes and the gal:
- Clear gesso + white gesso on the bottom: creates a nice protective barrier so I can use watery mediums later, the clear gesso adds a lot of gritty tooth and texture
- Acrylic paints on top of the dried gesso, Master's Touch paints from Hobby Lobby, Titanium White, Neutral Grey, Prussian Blue, Blue Grey, and Payne's Grey.
- Gallery Watercolor Crayons on top of acrylic
- Artecho soft pastels for depth and highlights
- A splash of acrylic inks
- Note 1: a 4B pencil was used to draw in the snowflakes and trace over the gal.
- Note 2: for me this exercise was about creating winter scenes rather than practicing portraits or figures; so I glued in a picture from Unsplash and drew/painted over it (huge time saver and great for those who are developing their portrait skills).


 pop in here and say...........