How can I create a gradient-filled circle in Photoshop that serves as a mask, with the inside center fully black and fading to a transparent outside border? I know a bit my way around in photoshop, but working with this gradient fill is not one of my skills 
Oscraps
You are using an out of date browser. It may not display this or other websites correctly.
You should upgrade or use an alternative browser.
You should upgrade or use an alternative browser.
Gradient mask
- Thread starter svanderhaegen
- Start date
I haven't used gradients for ages but here goes.........
1. On a new layer fill it with a solid color (you can always change it later)
2. Move your picture/image to the layer above, will look like this
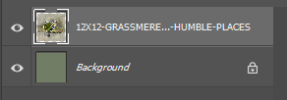
then add a mask to the image layer
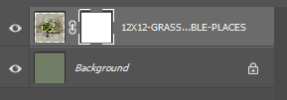
3. Next make sure your foreground and background colors are set to default, black & white
4. Click the gradient tool on the toolbar

5. In the gradient toolbar that appears on top, select the Foreground to Transparent gradient as shown below
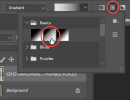
and click on the Radial style circle above
6. Working on the mask, position the cross cursor (circled below) in the middle of the area you want to focus on
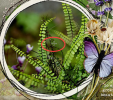
for my example above I wanted to have the general area around the circle to be the focal point.
7. Now start dragging out .. as you do so you will see the white circle shown below and stop when you are happy. The black dot on the outer ring can be used to make your selection larger or smaller. The smaller black dot in the middle allows you to move this selection over your image, just click and drag. When happy just click on your Move tool.
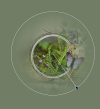
8. You can apply the mask at this stage to create an circular image, go to the Layer menu> Lyer Mask>Apply
9. Now you can add another layer below this and add your paper or change the colour as shown below.
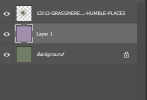

Of course you can play around with using different gradients and changing gradient strengths if you want to.
Hope that answers your question Sonja.
1. On a new layer fill it with a solid color (you can always change it later)
2. Move your picture/image to the layer above, will look like this

then add a mask to the image layer

3. Next make sure your foreground and background colors are set to default, black & white
4. Click the gradient tool on the toolbar
5. In the gradient toolbar that appears on top, select the Foreground to Transparent gradient as shown below

and click on the Radial style circle above
6. Working on the mask, position the cross cursor (circled below) in the middle of the area you want to focus on

for my example above I wanted to have the general area around the circle to be the focal point.
7. Now start dragging out .. as you do so you will see the white circle shown below and stop when you are happy. The black dot on the outer ring can be used to make your selection larger or smaller. The smaller black dot in the middle allows you to move this selection over your image, just click and drag. When happy just click on your Move tool.

8. You can apply the mask at this stage to create an circular image, go to the Layer menu> Lyer Mask>Apply
9. Now you can add another layer below this and add your paper or change the colour as shown below.


Of course you can play around with using different gradients and changing gradient strengths if you want to.
Hope that answers your question Sonja.
I’m gonna try it out later today. Already a huge thanks for this explanation @wombat146I haven't used gradients for ages but here goes.........
1. On a new layer fill it with a solid color (you can always change it later)
2. Move your picture/image to the layer above, will look like this
View attachment 397806
then add a mask to the image layer
View attachment 397807
3. Next make sure your foreground and background colors are set to default, black & white
4. Click the gradient tool on the toolbar
View attachment 397808
5. In the gradient toolbar that appears on top, select the Foreground to Transparent gradient as shown below
View attachment 397810
and click on the Radial style circle above
6. Working on the mask, position the cross cursor (circled below) in the middle of the area you want to focus on
View attachment 397812
for my example above I wanted to have the general area around the circle to be the focal point.
7. Now start dragging out .. as you do so you will see the white circle shown below and stop when you are happy. The black dot on the outer ring can be used to make your selection larger or smaller. The smaller black dot in the middle allows you to move this selection over your image, just click and drag. When happy just click on your Move tool.
View attachment 397813
8. You can apply the mask at this stage to create an circular image, go to the Layer menu> Lyer Mask>Apply
9. Now you can add another layer below this and add your paper or change the colour as shown below.
View attachment 397814 View attachment 397815
Of course you can play around with using different gradients and changing gradient strengths if you want to.
Hope that answers your question Sonja.
