
All members that participate, please remember to read and follow all the rules for this challenge
so that you can claim your challenge points. Thank you!
")
Hi everyone, Ona here with a big welcome to the Artsy/Mixed Media challenge for May! Yes you read correctly!!! May!!

As some of you may already know, I just love creating and looking at artsy/mixed media type layouts! The terms artsy/mixed media can be interchanged when discussing this style of artwork, and it essentially means that all types of mediums can be used in creating this the page. In physical terms artists will use textured mediums such as paint, fabric, stamps, paper pieces, gesso, fibers........ or virtually anything else you can actually stick down.
In a digital form we can use much the same thing but of course we may need to tweak some things in order to make our textures look 'touchable' and to give our page depth.For this month's challenge I want to look at our background papers and how we can add some depth and texture by adding another paper as an overlay on top of the background paper. You can start with a plain solid background paper first if you want to, or use a patterned paper, and then use another paper you might have in your stash, one that has a textured, creased or grungy look to it and use it as an overlay on the solid paper. I used a freebie from Joyful Heart Designs below which you might want to grab too if you don't already have it, link is below.
So the challenge this month is use one (or more) paper/s as an overlay over the top of another solid or patterned paper. You can't use any overlay png type files. Make sure to read the challenge rules at the bottom for more requirements.
Note: I use Photoshop but the steps shown below would be suitable for PSE and I think PSP might have some similar settings? Let me know when you post your page here if you were able to follow the steps set out.
I chose the #3 paper from Joyful Heart Designs Collage-ish [THREE] to start with. Now this already has a lot of stunning textures work on it but I wanted to experiment and see what would happen if I used another paper as an overlay on top of it. I ended up with a paper from I Lurrrve Grunge! Freebie, also from Jenn. The screen shot below shows the original paper plus the overlay paper I used on top. After playing around with some of the blend modes I was happy with the resulting effects.

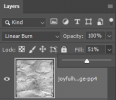
Step 1. To start with, this is what my layers looked like.
Note the Freebie paper I chose was paper #4 which was a light green. Before I started playing with the blend modes I desaturated the paper by using CTRL+SHIFT+U (or go to Image>Adjustments>Desaturate). The 'overlay' paper should be sitting above the background paper.

Step 2. On the overlay paper layer, I started to just try out different Blend modes and finally decided on the Linear Burn mode but lowered the Fill down to 51% .
Note Fill is virtually the same as Opacity

Step 3. The next thing I did was to go to Image>Adjustments>Levels and just tweaked the lighting on the paper a bit, adding a bit more contrast to give the page more depth, the result is shown below.

Step 4. The next step is to sharpen the overlay paper if needed. While not necessary for all papers, I wanted the creases to show up more on this paper so I used the Filter>Other>High Pass to sharpen.
Note: Any type of sharpening option can be used, I just normally use this one.

The steps above are the same I use whenever I am using another paper as an overlay. The blending modes might change of course and I may not sharpen every time so it all depends on the type effect you are after, whether you want the texture to be grungy or light.
Then I went ahead and added some embellishments and stamping to my papers and that is it!
Here is my completed page:
I used the following papers:
Background paper = Paper #3 from Collage-ish [THREE]
Overlay paper = Paper #4 from I Lurrrve Grunge! Freebie

Now it is your turn so bring on the grungy textures and artsy touches like paint, scribbles, gesso, paper collages and HAVE FUN! Can't wait to see what you creative ladies will create!!

-----------------------------------------------------------------
RULES:
- Use one (or more) paper/s as an overlay over the top of another solid or patterned paper.
- You can not use any overlay png type files, it needs to be jpg paper file
- You can scrap about any topic you like
- Please let me know which background paper you used + the paper you used as the overlay when you add your layout to
this thread
- Please use 80% Oscraps products that are currently in the store.
- Non-Oscraps products or retired O designer products can be used whether the designer is selling elsewhere or not.
- You need to credit all the products used on your layout.
- You need to credit the source of any photo(s) as per Gallery Guidelines
- Your layout can not be used for more than one challenge.
- Your page must be posted in the Challenge 2 gallery by midnight PST May 31, 2025 and linked back to this thread (see below on how to add your linked layout).
- And do not forget to update the CURRENT MONTH'S TRACKING THREAD to be eligible for your coupon.
Adding a linked layout from the Gallery to a thread:
1. Upload your layout to the gallery first. In your forum post click the Gallery Embed icon (little camera).
2. This will open your gallery, simply click on the layout you require, then scroll down to the bottom of the screen and click the Continue button.
3. Your linked layout is now in your post, the image will appear once you have clicked the Post Reply button.
Attachments
Last edited:
