hoodsmom
Guess Who!
To make your own mask "from scratch" or to isolate your own line art, you need to start with a an image that has a solid "foreground" on white and remove the white. I tested this method in Affinity. For simplicity's sake I'm saying you have to separate black from white, but really you're removing the white from a foreground that has no white in its pixels.
Step 1. Use levels to increase the contrast between black and white
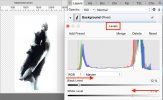
I snapped a picture of an abstract hanging in a public location (at an angle so there wasn't any glare from the glass). Move the white slider to the left and the black slider to the right. The idea is to make the background as white as possible while preserving as much black as possible in the draft mask. After applying levels, it's a good idea to make a duplicate of your draft mask as a "safety" measure. Note that you don't have to have a B&W image to start with. You do need something pretty contrasty that's amenable to using the B&W adjustment to make a draft mask very black and other colors you don't want in your mask solid white.

If you hold the option key (Mac - I assume it's ALT on PC) while dragging the white slider, you can see everything that will be erased in the next step because it appears black. In theory, things that will be retained should appear white and things that will be partly retained (translucent in the final mask) are other colors. But you can see from the next image that more things were translucent than expected in the actual mask.
Step 2 Target the draft mask layer (called by the uninspiring name "Background" in my example) and use the Erase White Paper filter to erase all the white pixels (Filters > Colors > Erase White Paper).
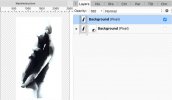
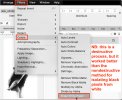
Erase White Paper erases the "white" from "grey" areas, so if you don't have a substantial mass of pixels that are truly all "black," you won't get a good mask.
Step 3. Make a selection fairly close to the draft mask and cut the selection onto its own layer. This gets rid of stray black pixels far from the draft mask, reducing the amount you have to clean up. You can delete the original "parent" layer.
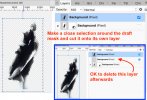
Step 4. Apply a (red outside) outline FX to the draft mask to reveal stray or unwanted black pixels. As I'm not doing an ultra-careful extraction, I just use an eraser brush to get rid of stuff I don't want, but if you need to be nondestructive, you can mask the unwanted pixels and rasterize the masked layer when you're satisfied.
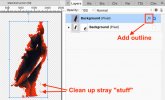
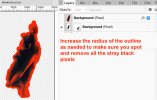
Last step. Turn off the outline FX and test the mask
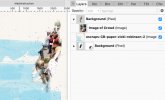
Step 1. Use levels to increase the contrast between black and white

I snapped a picture of an abstract hanging in a public location (at an angle so there wasn't any glare from the glass). Move the white slider to the left and the black slider to the right. The idea is to make the background as white as possible while preserving as much black as possible in the draft mask. After applying levels, it's a good idea to make a duplicate of your draft mask as a "safety" measure. Note that you don't have to have a B&W image to start with. You do need something pretty contrasty that's amenable to using the B&W adjustment to make a draft mask very black and other colors you don't want in your mask solid white.

If you hold the option key (Mac - I assume it's ALT on PC) while dragging the white slider, you can see everything that will be erased in the next step because it appears black. In theory, things that will be retained should appear white and things that will be partly retained (translucent in the final mask) are other colors. But you can see from the next image that more things were translucent than expected in the actual mask.
Step 2 Target the draft mask layer (called by the uninspiring name "Background" in my example) and use the Erase White Paper filter to erase all the white pixels (Filters > Colors > Erase White Paper).


Erase White Paper erases the "white" from "grey" areas, so if you don't have a substantial mass of pixels that are truly all "black," you won't get a good mask.
Step 3. Make a selection fairly close to the draft mask and cut the selection onto its own layer. This gets rid of stray black pixels far from the draft mask, reducing the amount you have to clean up. You can delete the original "parent" layer.

Step 4. Apply a (red outside) outline FX to the draft mask to reveal stray or unwanted black pixels. As I'm not doing an ultra-careful extraction, I just use an eraser brush to get rid of stuff I don't want, but if you need to be nondestructive, you can mask the unwanted pixels and rasterize the masked layer when you're satisfied.


Last step. Turn off the outline FX and test the mask

Last edited: