Oscraps

JAN|FEB|MARCH 2022 - Come and share any of your recent Mixed Media projects.

wombat146

ONA - Administrator
CHEERY O
Hi everyone! Has anyone completed any "real life" Mixed Media (MM) projects of late? Come and post a picture (or two) of your work here, so we can all oooh and ahhh over it, and perhaps learn something new about a process or technique, so make sure to include a brief description of how you created the piece and what medium you used. :)
 

vickyday

Love my O Family!
CHEERY O
Funny you should ask! ;)
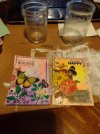
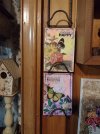
I just happen to be working on a project for some wire shelves that I am having to make unique art work for because of the size of the "shelves". I am using the cardboard backing from pads of paper as my canvas. I have 8 to make. I have 2 done!
Process: I covered the cardboard with white gesso. I used Faber Castell Gelatos rubbed with my finger. Added the stamping and then the ephemera with matte medium.
IMG_20220314_205457881-web.jpg IMG_20220314_205629890-web.jpg
 

wombat146

ONA - Administrator
CHEERY O
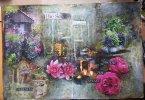
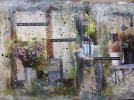
I recently have completed a couple of two page projects in my art journal, in the style of Laly Mille. I absolutely have fallen in love with Laly's work and am enjoying using the process she uses. In both of these pieces I have used pictures cut (or torn) out of magazines as the predominate focus of my pages. I have included some process steps below the pictures.

THE SECRET GARDEN
DSCN6419-(2)-800w.jpg

JUST BECAUSE
2-DOUBLE-PAGER---CLOSER-LOOK-800w.jpg

PROCESS STEPS (ROUGHLY :))
1. Find your magazine pictures, the ones shown here are from various magazines like home and garden type ones. Either cut them out or tear them.

2. Before you start to glue them down, decide if you want to add some acrylic paint or gesso to your surface to *prime you paper first. I used clear gesso to do that for my The Secret Garden project, but for the Just Because I just started sticking down the pictures with matte medium and cover the pictures and the rest of the paper with it as well.
*priming your page with gesso or matte medium just prepares your paper so that nothing soaks into your paper too much to wrinkle it, and gives a better surface for paint and other mediums to adhere to.

3. After gluing down the magazine pictures and covering them with matte medium, my next step is to apply some white gesso (or white opaque acrylic paint) to the paper, blending in the outer edges of the pictures, then I let all of it dry completely.

4. In this step I introduce some colour in way of watercolour, acrylic or Neocolor II water soluble pastels. First I look at the colours in the magazine and pick out a neutral tone that will help blend everything together. In both of these projects I started with a light watercolour wash using Payne's Grey, again let it dry. Then I tone down the areas of colour that are too dark with more white gesso or acrylic paint. When I am happy with the background I use a light covering of matte medium to 'set' the colour so that I don't smear or smudge the watercolours. Again let it dry. (there is a LOT of waiting for things to dry doing these types of pages! LOL!!!)

5. Now comes the fun bit of using inks, whether they are the water-soluble distress inks, or the fabulous alcohol inks that I also will use with water to paint with. I love how the inks add a beautiful transparent layer. Using alcohol inks is especially fun as after I have applied several layers around the art piece, I then use alcohol by itself to splatter across the ink layers which in turn reacts to alcohol inks beneath it, leaving these beautiful splotches and splatters!!

6. Of course, this is the time to also add some stencil work if you want to, or do some stamping, or whatever else you would like to experiment with.

7. I love seeing some written script on the page so this when I grab a gel pen and start writing.......... I write so that you can not understand or see the actual words, just loosely filling in the page with words or phrases or just gobbly-gook nonsense that doesn't mean anything, but looks like text. Of course that is just my choice, you can write whatever you like. :)

8. The next layer involves getting messy with some paint runs.... I normally use acrylic paint for this, very watery so that it will flow down the page here and there. I sometimes will use an acrylic ink for this as well but I just want something to blend into the background and not stand out too much so I will blot some runs with a tissue or paper towel to make them a bit more translucent.

9. At this stage I also had some paint splatter, normally in either white or black, or both. :) and I also go around the edges of my paper with ink, a stabilo pencil (water soluble) or a Neocolor II water soluble pastel to darken the edges and give them a grungy look.

10. To finish off I find some cut out words from a magazine, an old book, or a purchased pack of word arts to finish of my page.

I mentioned in the title above that these are roughly the steps I have taken, I can't remember every single one and there were times I went back to add another paint layer etc. So this is a rough description of the process I used, not totally the exact steps that I took! :)

Also, I learned that it helps to have a couple of projects on the go at the same time. In most cases you are having to wait for one piece to dry so it helps to have something else to turn to. However, I have found that sometimes I become 'stuck', I am not sure what needs to be done next, do I want to add some stencil work, or stamping? or do I want to change any of the design at this stage by sticking something over the top of an area that isn't working?? So having something else to work on allows you to just stop and take a step back so that you can mull over what you would like to do next. Of course it doesn't need to be another project that you turn to, it could just be going outside for a walk, doing some housework (perish that thought!), read a book or do some gardening etc etc. The point is to just leave it alone. Some projects of mine have been completed within a couple of days while some have taken me weeks to finish, and of course there are still quite a few that need finishing, but I am learning that when I open my art journal at an unfinished page, in a lot of cases I instantly "see" what I want to/need to do next. There is no rush to finish anything! :)
 

wombat146

ONA - Administrator
CHEERY O
Funny you should ask! ;)
I just happen to be working on a project for some wire shelves that I am having to make unique art work for because of the size of the "shelves". I am using the cardboard backing from pads of paper as my canvas. I have 8 to make. I have 2 done!
Process: I covered the cardboard with white gesso. I used Faber Castell Gelatos rubbed with my finger. Added the stamping and then the ephemera with matte medium.
View attachment 368110 View attachment 368111
What a cool idea Vicky! How wonderful to see some positive affirmations hanging on the wall to see each day, and you can just change them out whenever you need to! Very creative!!! Love it.
 

wombat146

ONA - Administrator
CHEERY O
Oh Jean, I love the organic feel to this art piece of yours! actually I am quite enthralled with it and keep seeing little people and scenes within it!! Absolutely beautiful!
 

vickyday

Love my O Family!
CHEERY O
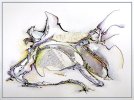
Ona, those are wonderful! So glad you shared. I've got a mixed media drawing sitting while I decide whether it's done. I call these mental landscapes. This one is ink, collage and colored pencil. It doesn't have a title as yet.

View attachment 368113
This is so cool, Jean! First thing I see is a hand holding something! So much to look at!
 

Vicki Robinson

Designer + Brush Queen + Mac Guru
Designer
Funny you should ask! ;)
I just happen to be working on a project for some wire shelves that I am having to make unique art work for because of the size of the "shelves". I am using the cardboard backing from pads of paper as my canvas. I have 8 to make. I have 2 done!
Process: I covered the cardboard with white gesso. I used Faber Castell Gelatos rubbed with my finger. Added the stamping and then the ephemera with matte medium.
View attachment 368110 View attachment 368111
Those are wonderful @vickyday!
 

Vicki Robinson

Designer + Brush Queen + Mac Guru
Designer
I recently have completed a couple of two page projects in my art journal, in the style of Laly Mille. I absolutely have fallen in love with Laly's work and am enjoying using the process she uses. In both of these pieces I have used pictures cut (or torn) out of magazines as the predominate focus of my pages. I have included some process steps below the pictures.
I saw this on FB, Ona! It's fabulous! It reminded me I still have two of Laly's classes to finish!
 

Vicki Robinson

Designer + Brush Queen + Mac Guru
Designer
Thanks @wombat146 for the reminder! I meant to post a few things here and totally forgot! Lol!

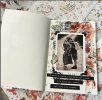
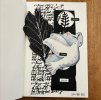
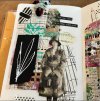
I've really been into creating mini collages - here are just a couple I've posted on Instagram. The first one uses some of Katie Pertiet's new line of products and the other two use some of my own handmade collage fodder and Tim Holtz dolls. If you're on Insta, you should be able to see a little "reel" with a couple of other pages from my journal.

vrd-01.jpg vrd-02.jpgvrd-03.jpg

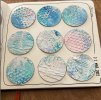
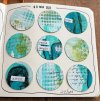
I'm also trying to complete a 100 Days of Art project on Instagram and have chosen to punch 1.5 inch circles from mixed media backgrounds that were never used for a project — such as the first one. I am also doing the same for old loose journal pages that I didn't want to bind and were just sitting around gathering dust — calling those "deconstructed journal pages" lol. There is no required format for the challenge, but I'm following another Instrammer's (scrapdiary) idea of the grid with no other adornment. I specifically chose a plan that I thought I could actually DO because I've never finished one of these 100 Days projects although I have started more than a few. Lol!

vrd-04.jpg vrd-05.jpg
 

vickyday

Love my O Family!
CHEERY O
Thanks @wombat146 for the reminder! I meant to post a few things here and totally forgot! Lol!

I've really been into creating mini collages - here are just a couple I've posted on Instagram. The first one uses some of Katie Pertiet's new line of products and the other two use some of my own handmade collage fodder and Tim Holtz dolls. If you're on Insta, you should be able to see a little "reel" with a couple of other pages from my journal.

View attachment 368151 View attachment 368152View attachment 368153

I'm also trying to complete a 100 Days of Art project on Instagram and have chosen to punch 1.5 inch circles from mixed media backgrounds that were never used for a project — such as the first one. I am also doing the same for old loose journal pages that I didn't want to bind and were just sitting around gathering dust — calling those "deconstructed journal pages" lol. There is no required format for the challenge, but I'm following another Instrammer's (scrapdiary) idea of the grid with no other adornment. I specifically chose a plan that I thought I could actually DO because I've never finished one of these 100 Days projects although I have started more than a few. Lol!

View attachment 368155 View attachment 368156
Vicki, what size are the pages your mini collages done on?
I've tried the 100 day projects but NEVER finish, either! Actually, I just barely get started before I'm off on another tangent!
 

Vicki Robinson

Designer + Brush Queen + Mac Guru
Designer
Vicki, what size are the pages your mini collages done on?
I've tried the 100 day projects but NEVER finish, either! Actually, I just barely get started before I'm off on another tangent!

It's a 5 x 7.5 inch journal, so roughly half the size of my regular journals. Not SUPER mini because my hands aren't flexible enough anymore for tiny journals. The 100 Day Project is in a 5x5 and that's as small as I can go. Lol.
 

vickyday

Love my O Family!
CHEERY O
It's a 5 x 7.5 inch journal, so roughly half the size of my regular journals. Not SUPER mini because my hands aren't flexible enough anymore for tiny journals. The 100 Day Project is in a 5x5 and that's as small as I can go. Lol.
That's about TN size, right?
 

Betty Jo

♥ Lovin' the O ♥
Thanks @wombat146 for the reminder! I meant to post a few things here and totally forgot! Lol!

I've really been into creating mini collages - here are just a couple I've posted on Instagram. The first one uses some of Katie Pertiet's new line of products and the other two use some of my own handmade collage fodder and Tim Holtz dolls. If you're on Insta, you should be able to see a little "reel" with a couple of other pages from my journal.

View attachment 368151 View attachment 368152View attachment 368153

I'm also trying to complete a 100 Days of Art project on Instagram and have chosen to punch 1.5 inch circles from mixed media backgrounds that were never used for a project — such as the first one. I am also doing the same for old loose journal pages that I didn't want to bind and were just sitting around gathering dust — calling those "deconstructed journal pages" lol. There is no required format for the challenge, but I'm following another Instrammer's (scrapdiary) idea of the grid with no other adornment. I specifically chose a plan that I thought I could actually DO because I've never finished one of these 100 Days projects although I have started more than a few. Lol!

View attachment 368155 View attachment 368156
Oh my, Vicki, these are so beautiful. I love them all. ♥
 

Betty Jo

♥ Lovin' the O ♥
Funny you should ask! ;)
I just happen to be working on a project for some wire shelves that I am having to make unique art work for because of the size of the "shelves". I am using the cardboard backing from pads of paper as my canvas. I have 8 to make. I have 2 done!
Process: I covered the cardboard with white gesso. I used Faber Castell Gelatos rubbed with my finger. Added the stamping and then the ephemera with matte medium.
View attachment 368110 View attachment 368111
Vicky, these are gorgeous! ♥
 

Betty Jo

♥ Lovin' the O ♥
I recently have completed a couple of two page projects in my art journal, in the style of Laly Mille. I absolutely have fallen in love with Laly's work and am enjoying using the process she uses. In both of these pieces I have used pictures cut (or torn) out of magazines as the predominate focus of my pages. I have included some process steps below the pictures.

THE SECRET GARDEN
View attachment 368105

JUST BECAUSE
View attachment 368106

PROCESS STEPS (ROUGHLY :))
1. Find your magazine pictures, the ones shown here are from various magazines like home and garden type ones. Either cut them out or tear them.

2. Before you start to glue them down, decide if you want to add some acrylic paint or gesso to your surface to *prime you paper first. I used clear gesso to do that for my The Secret Garden project, but for the Just Because I just started sticking down the pictures with matte medium and cover the pictures and the rest of the paper with it as well.
*priming your page with gesso or matte medium just prepares your paper so that nothing soaks into your paper too much to wrinkle it, and gives a better surface for paint and other mediums to adhere to.

3. After gluing down the magazine pictures and covering them with matte medium, my next step is to apply some white gesso (or white opaque acrylic paint) to the paper, blending in the outer edges of the pictures, then I let all of it dry completely.

4. In this step I introduce some colour in way of watercolour, acrylic or Neocolor II water soluble pastels. First I look at the colours in the magazine and pick out a neutral tone that will help blend everything together. In both of these projects I started with a light watercolour wash using Payne's Grey, again let it dry. Then I tone down the areas of colour that are too dark with more white gesso or acrylic paint. When I am happy with the background I use a light covering of matte medium to 'set' the colour so that I don't smear or smudge the watercolours. Again let it dry. (there is a LOT of waiting for things to dry doing these types of pages! LOL!!!)

5. Now comes the fun bit of using inks, whether they are the water-soluble distress inks, or the fabulous alcohol inks that I also will use with water to paint with. I love how the inks add a beautiful transparent layer. Using alcohol inks is especially fun as after I have applied several layers around the art piece, I then use alcohol by itself to splatter across the ink layers which in turn reacts to alcohol inks beneath it, leaving these beautiful splotches and splatters!!

6. Of course, this is the time to also add some stencil work if you want to, or do some stamping, or whatever else you would like to experiment with.

7. I love seeing some written script on the page so this when I grab a gel pen and start writing.......... I write so that you can not understand or see the actual words, just loosely filling in the page with words or phrases or just gobbly-gook nonsense that doesn't mean anything, but looks like text. Of course that is just my choice, you can write whatever you like. :)

8. The next layer involves getting messy with some paint runs.... I normally use acrylic paint for this, very watery so that it will flow down the page here and there. I sometimes will use an acrylic ink for this as well but I just want something to blend into the background and not stand out too much so I will blot some runs with a tissue or paper towel to make them a bit more translucent.

9. At this stage I also had some paint splatter, normally in either white or black, or both. :) and I also go around the edges of my paper with ink, a stabilo pencil (water soluble) or a Neocolor II water soluble pastel to darken the edges and give them a grungy look.

10. To finish off I find some cut out words from a magazine, an old book, or a purchased pack of word arts to finish of my page.

I mentioned in the title above that these are roughly the steps I have taken, I can't remember every single one and there were times I went back to add another paint layer etc. So this is a rough description of the process I used, not totally the exact steps that I took! :)

Also, I learned that it helps to have a couple of projects on the go at the same time. In most cases you are having to wait for one piece to dry so it helps to have something else to turn to. However, I have found that sometimes I become 'stuck', I am not sure what needs to be done next, do I want to add some stencil work, or stamping? or do I want to change any of the design at this stage by sticking something over the top of an area that isn't working?? So having something else to work on allows you to just stop and take a step back so that you can mull over what you would like to do next. Of course it doesn't need to be another project that you turn to, it could just be going outside for a walk, doing some housework (perish that thought!), read a book or do some gardening etc etc. The point is to just leave it alone. Some projects of mine have been completed within a couple of days while some have taken me weeks to finish, and of course there are still quite a few that need finishing, but I am learning that when I open my art journal at an unfinished page, in a lot of cases I instantly "see" what I want to/need to do next. There is no rush to finish anything! :)
Ona, this is so incredible. If I didn't know it was yours, I would have thought for sure it was Laly's art. Gorgeous! ♥
 
Top