Kythe
Well-Known Member
Curved Corner Template Tutorial
by Kythe
Save the triangle as a PNG to use on any paper by adjusting the size of the triangle.
10 Shadows applied when using the template.
If you want a ragged edge, follow the same steps as above.
On the triangle layer, make a layer mask and using a rough brush, (small paint brush icon in the tools panel) color picker at black and mode darken. Cut away the diagonal edge. Start small and increase to get the desired effect.
Using a layer mask is a non-destructive method. To fix any mistakes simply change the color picker to white and mode to lighten then go over the areas you want to erase and they reappear.
Save as a PHOTOSHOP layered PNG. OR just save the triangle as a PNG to use on any paper
Click on the attachment below to get a PDF copy of the tutorial
by Kythe
- This curve will be a narrow fold across the entire top of the page. This method can be rotated and used on any corner and made as large or small as you please.
- Colour your first layer white.
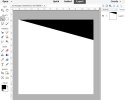
- Use the polygonal lasso tool and draw a triangle across the top part of the white layer starting in the left corner and proceed down and across about 3”. Be sure to close the triangle by bringing the tool back to the left corner (fig 1)
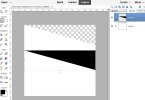
- Fill the triangle with black and cut then paste. The black triangle should now be on a separate layer but in the wrong place. (fig 2)
- fig1 fig 2


- Move the black triangle so that it fits across the diagonal. It will be shorter than the white page.
- Curving the wide edge.
- There are 2 ways to get a curved look:
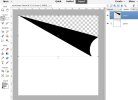
- - In the Filter Gallery>distort>liquify adjust the basic circle curser to the size of the wide end of the triangle and slowly move it to create a pleasing bend. (fig 3).
- In PSE 2022 tucked in with the Image tools image>transform>warp is a warp tool. You can move the dots to create the desired curve.

- After making the curve, drag the wide end of the black triangle to the right side of the white layer until it is just a smidge away from the paper’s edge.
- Take a small basic eraser and carefully round the corner of the white layer up toward the black triangle to give it a rounded edge.
- Highlights and Shadows
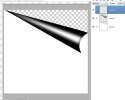
- Add a highlight on the top of the curve to enhance the curvature. To do this use the dodge and burn tool. (fig4)
- -To make the highlight, use the dodge tool feathered slightly and set at low opacity of about 20 along the middle. (Each time you move the tool over the area the paper lightens) Drag the tool horizontally down the length of the triangle starting with a small brush and gradually getting larger as the triangle widens.
- - To make the shadows, use the burn tool at a low opacity and a feathered brush. Gradually move the brush along the length of the triangle above and below the highlight. Darken as you like.
- An option can be to do step 8 on the actual paper you want to use rather than have it on the template. That way you have more control over how much shine is on the paper.
- Fig 4
- Now you have a template ready to use. You can simply clip papers to it and complete step 10
Save the triangle as a PNG to use on any paper by adjusting the size of the triangle.
10 Shadows applied when using the template.
- On the actual paper you want to use you can adjust the shadows to suit the paper.
- Use the burn tool to get the shadow under the curved opening just right. It should be fairly light but enough to create depth. Just play.
- The top of the triangle next to the background paper should have a very small shadow or none at all. Adjust your shadow angle for the all papers in the Layers>layer style so that the shadows are in the correct place which is below the bottom of the triangle and on the white section. (Of course, you can make your own shadows rather than the standard that come with the software.)
If you want a ragged edge, follow the same steps as above.
On the triangle layer, make a layer mask and using a rough brush, (small paint brush icon in the tools panel) color picker at black and mode darken. Cut away the diagonal edge. Start small and increase to get the desired effect.
Using a layer mask is a non-destructive method. To fix any mistakes simply change the color picker to white and mode to lighten then go over the areas you want to erase and they reappear.
Save as a PHOTOSHOP layered PNG. OR just save the triangle as a PNG to use on any paper
Click on the attachment below to get a PDF copy of the tutorial
Attachments
Last edited: