Everything by Anna Aspnes:
New today:
6 x 6 ArtsyKardz Serenity
http://www.oscraps.com/shop/product.php?productid=44120&cat=398&page=1
On Sale:
ArtPlay Palette Salty Living
http://www.oscraps.com/shop/product.php?productid=30847&cat=398&page=1
Warm Glows No. 1
http://www.oscraps.com/shop/product.php?productid=29651&cat=398&page=2
Textured Overlays No. 1
http://www.oscraps.com/shop/product.php?productid=28019&cat=398&page=2
MonoBlendz Oceana No. 1
http://www.oscraps.com/shop/product.php?productid=28433&cat=398&page=2
Stitched by Anna Tan No. 1
http://www.oscraps.com/shop/product.php?productid=27801&cat=398&page=2
Vellum AlphaNumberSet No. 1
http://www.oscraps.com/shop/product.php?productid=30536&cat=398&page=1
AnnaBlendz Artsy No. 2
http://www.oscraps.com/shop/product.php?productid=27911&cat=398&page=2
Also by Anna:
ArtPlay Palette Ocean Cove
http://www.oscraps.com/shop/product.php?productid=43872&page=1
LaceTextures No. 1
http://www.oscraps.com/shop/product.php?productid=43870&page=1
ArtPlay Palette Viaggio
http://www.oscraps.com/shop/product.php?productid=31151&page=1
SeaShells No. 1
http://www.oscraps.com/shop/product.php?productid=43869&cat=383&page=2
Font: A Little Pot
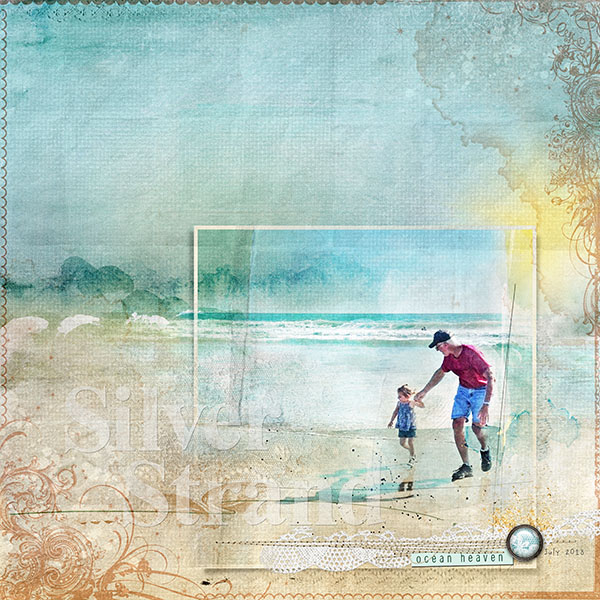
The process: I began with an Artsy Paper from ArtPlay Palette Salty Living. I added the 6 x 6 ArtsyKard in psd format, and placed the photo over the kard. I attached copies of the photograph to a variety of paint layers on the kard. I then moved around some of the paint layers on the kard to extend off of the edge of the 6x6 kard. I added a custom shadow to the kard base, removing any shadow from the center vertical points of the kard, and exaggerated the corners. I added the Textured Overlay, changing its color and placing it on Blend Mode Linear Burn. I placed the base layer of the 6 x 6 ArtsyKard on blend mode Color Burn so that the background Artsy Paper would show through, and added a stroke in soft beige to create a frame. I used the folded canvas paper from Oceana Paperie to the top of the layer stack, desaturated it, and placed it on blend mode Linear Burn so that the page took on its texture. I added the Warm Glow to the background paper, but also duplicated it, attaching it to the ArtsyKard as well. This way the shadow is not covered up by the Warm Glow. To add color, I then added the AnnaBlendz (horizontally) to both the top and bottom of the layout, changing their colors to the turquoise for the top edge, and sand colored for the bottom, and used blend mode Color Burn. I added the lace, stitching, brad, and word strip to the lower right of the framed portion of the image, as well as transfers and brushwork throughout the layout. I added a page title using the Vellum Alpha, and gave it a soft beveled edge to make it look like a bit of a shadow. The layout was done, but since I used a paper to create texture, the entire layout was darkened just a tad, so after flattening, I brought the flattened final image into RadLab and used one of their filters to lighten and brighten without losing the texture.
***TFL***