All members that participate, can everyone PLEASE ensure that you read all the rules for this challenge
so that you can claim your challenge points. Thank you!
")
Hi everyone, hope everyone is doing well! Down in Tasmania we are in the middle of Autumn so getting ready for the cold weather to start arriving next month but we are still having some lovely sunny autumn days!
This month I wanted to share some techniques on one of my favorite things to do with my digi art, BLENDING!! By now I guess you all know that I absolutely love doing that so I wanted to show you step by step the process I use for a lot of my big photo pages.
So the challenge this month is to basically use a large photo, one that covers your entire page, and then blend some papers and other stuff into it, like stamps, brushwork etc. This tutorial is for Photoshop CC so if you have Elements or another software program, you are welcome to use clip mask/png files to blend your photo and papers, but the main part of the challenge here is to use a photo that covers your page entirely and blend some papers into it!
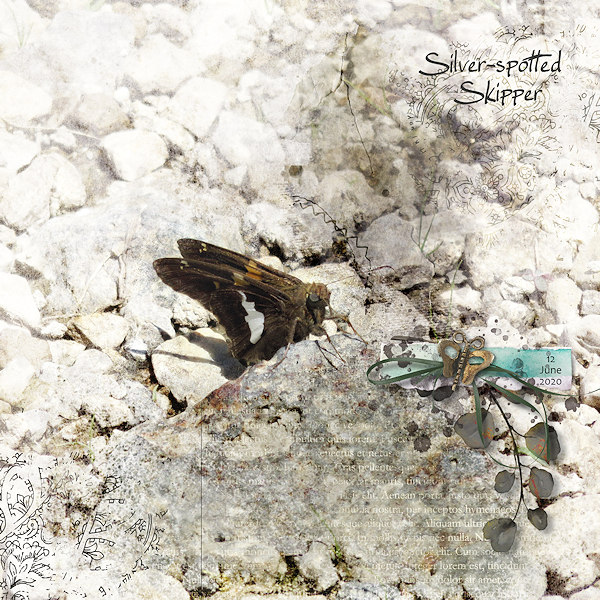
Firstly, here is my finished page, I wanted to give you an idea of what the finished creative process would look like and to also give a reference of sort to look at as you work.

Credits are in the gallery.
Let’s begin:
Step 1 - Selecting and preparing papers
I often combine different papers together to give me the look that I am after. I knew that I wanted to scrap a photo of a beach that we visited a couple of months back so I was looking for some aqua/blue and beige tones in the papers. I ended up choosing 5 papers from the Oscraps Brave Collaboration and moved them onto my layout.
Paper #1 was the main background paper I wanted, so I moved this one first, then moved the rest of the papers over and placed them on top, in no particular order. Using my photo as a reference, I worked out just what parts of each paper layer I wanted to expose.

Step 2 - Add Hide All Mask to Paper Layers
I then added a Hide All layer mask to all of the papers that I would be working with, except for Paper 1 which would stay as is (shown above). By the way, all of these paper layers are set to 100% Opacity with no blend modes applied to them.
Use the ALT key on a PC while you click on the mask tool, this will add an ALL BLACK mask, which in turn is known as a Hide All mask (the default mask when you normally just click on is White which is known as a Reveal All mask.)
Step 3 - Revealing selected areas of each paper layer
Because we used a Hide All mask (all black), we will need to use a white brush to reveal (expose) the parts of the paper that we want to keep, to have visible. But before we do that let’s have a quick chat about the brushes to use.
Selecting your Brushes
Your brush is very important as it can set the mood for your entire layout. For this particular page I wanted a fluid, watery, painterly feel to the background, to give the impression of moving water as I wanted to use seaside photo.
To create this type of effect you need to use a painting brush that has soft edges so that the brush outline is not visible. My choice for this page was Florju Design’s Babies Watercolor Brushes PU I loved the soft feel to them, like watercolor stains but still with a soft edge to them so that you wouldn’t see any overlapping of the brush strokes.
Of course there are many types of brushes in the store from our talented designers so go take a look or you might even have some in your own stash!! There are also plenty of free brushes on the internet that you can get as well.
There are also plenty of free brushes on the internet that you can get as well.Revealing yours parts of the paper
Okay, now starts the fun part!! Here is where you start your creative process. There is no set pattern to what paper you want to work on first, just go with your own intuition and have fun!!
As seen in the image above, I have circled the areas on the paper that I wanted to keep, so using a white brush with low opacity (12 - 15%) I started revealing just those parts. Always always start off with a very low opacity when doing this sort of blending, you need to slowly build up the parts you want to reveal (expose). Remember, you can always go back and reveal more (or hide) a paper layer after you have added your photo.
When I was happy with my final background composition I also added some watercolour splatters from the Oscraps Brave Heart Collaboration kit. This is what my base looks like at this stage.

Step 3 - Adding and positioning your photo
We are ready to add a photo, but remember our photo needs to be BIG and fill the entire page! By now you would have some idea as to where your photo was going to go, based on what parts of the papers you revealed in the earlier steps.
I moved my photo over, and using Normal mode I lowered the opacity so that I could see the papers below it. I wanted the foreground of my photo, featuring the rocky coastline to sit on the darker area of the paper I revealed in paper layer #5. I enlarged the photo to get that right. The image below shows the area where I want my focal point to be on my layout, see how the rocks in the foreground are sitting over the darker area of paper layer #5 (Shown as A with B being the outer area of the focal area).

Now we are ready to start blending our photo into the background we have just created. I duplicated my existing photo layer twice and then changed the blend mode and opacity for each photo layer as shown above.
Then I added a Reveal All layer mask (white) and then used a soft black brush to hide the parts of each photo layer, hiding places where it was too dark/too light etc.
Note: You may not need three photo layers, play around until you are happy with your own photo.
Before I finished off this section of the process, I came across a paper by After Midnight Designs in her Summertime Mini Kit which I fell in love with and had to add it to my layout.
This paper sat on top of the photo using a Soft Light blend mode at 82% Opacity, I felt it gave my layout more of the 'watery' effect I was after and gave the blue/green tones a nice soft pop.Step 5 - Finishing off the layout
At this point I started adding my other elements to the layout, some which I blended in. It would take me too long to type all of that info out but please, if you have any questions then ask way and I will be happy to tell you how/what I did with them.
Looking forward to seeing your layouts, and as always if you have any questions then please ask away, only too happy to help! xx
RULES:
- Use a photo that fills your entire page and blend at least three (3) different papers into it.
- Please use 80% Oscraps products that are currently in the store.
- Non-Oscraps products or retired O designer products can be used whether the designer is selling elsewhere or not.
- You need to credit all the products used on your layout.
- Your layout can not be used for more than one challenge.
- Your page must be posted in the Challenge 4 gallery by midnight PST May 31 2021 and linked back to this thread (see below on how to add your linked layout).
- And do not forget to update the CURRENT MONTH'S TRACKING THREAD to be eligible for your coupon.
Adding a linked layout from the Gallery to a thread:
1. Upload your layout to the gallery first. In your forum post click the Gallery Embed icon (little camera).
2. This will open your gallery, simply click on the layout you require, then scroll down to the bottom of the screen and click the Continue button.
3. Your linked layout is now in your post, the image will appear once you have clicked the Post Reply button.
Last edited: