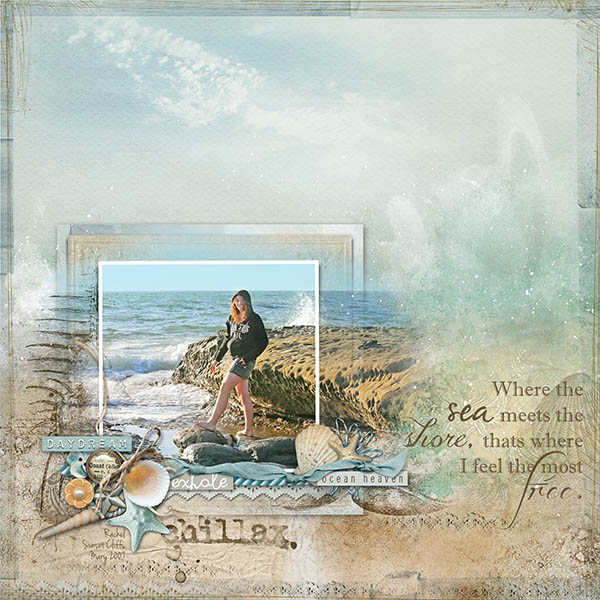
I adore beach/ocean layouts, so I immediately fell in love with Annas new ArtPlay Palette.
By Anna Aspnes:
***New***
ArtPlay Palette Ocean Cove http://www.oscraps.com/shop/product.php?productid=43872&cat=383&page=1
Ocean Cove WordArt No. 1 http://www.oscraps.com/shop/product.php?productid=43872&cat=383&page=1
Lace Textures No. 1 http://www.oscraps.com/shop/product.php?productid=43870&cat=383&page=1
SeaShells No. 1 http://www.oscraps.com/shop/product.php?productid=43869&cat=383&page=1
Also by Anna Aspnes:
6 x 6 ArtsyKardz Skys the Limit http://www.oscraps.com/shop/product.php?productid=43822&cat=383&page=1
ArtPlay Palette Skys the Limit http://www.oscraps.com/shop/product.php?productid=43776&cat=383&page=1
ArtPlay Palette Salty Living http://www.oscraps.com/shop/product.php?productid=30847&page=1
SaltySea No. 1 http://www.oscraps.com/shop/product.php?productid=30857&page=1
Scratched Overlays No. 1 http://www.oscraps.com/shop/product.php?productid=28009&page=1
Layered Edge Overlays No. 2 http://www.oscraps.com/shop/product.php?productid=30612&page=1
Different Strokes No. 7 http://www.oscraps.com/shop/product.php?productid=28718&page=1
Also used:
Nantucket Pretties by Forever Joy http://www.oscraps.com/shop/product.php?productid=43767&page=1
The Process: I started with one of the background papers that had some transfer work on it already. I added the photograph, and the photo frame. The photo was attached to the photo mask of the frame. I copied the photo and placed it under the frame shadow. With the bottom photo layer selected, I masked the entire photo by holding down the ALT key and clicking the Add Layer Mask button, causing it to disappear. I then picked a reduced opacity watercolor brush (or any soft brush) and began painting in the portion of the photo which fell outside of the photo frame. I added some additional transfers from the the same artplay, to help blend the edges of the photo. I loved the wide rectangular frame from the kit, and decided to use it by placing it under the bottom photo. Because the photo layer above extended beyond this rectangular frame, I was able to copy this frame, and dragged the copy down so that it appeared to look like a square frame underneath the thin white frame. I then took one of the 6x6 ArtsyKardz from Skys the Limit, and placed that under the rectangular frame pieces. I added a rather large, but soft shadow to it, but again, where the photo above fell over the ArtsyKard, it blended out the card, so only the corners, the top and bottom showed. I then began adding the shell brushes. I placed them along the frame edges, changing their color to a brown, and used the blend mode Darken. I added the two edge overlays, changing their colors and blend modes, and then added the Lace Textures here and there along the bottom. Next, I began bringing in the various shells, buttons and other elements, playing around with placement along the bottom edge of the white frame. I included a few linear pieces as well, like the diagonally striped ribbon, the lace transfer and the knotted ribbon. The beige knotted ribbon was getting lost where I placed it, so I created a new layer above it, and painted the area where the ribbon was, a pale blue wash of color, which I then attached to the knotted ribbon, and changed its blend mode to Color. I added the word art to the right, playing around with different fonts until I liked the look (font are so fun!!!).
Fonts: Imprint MT Shadow, Im fashionista, Jellyka Delicious Cake, Before the Rain
***thanks for looking***