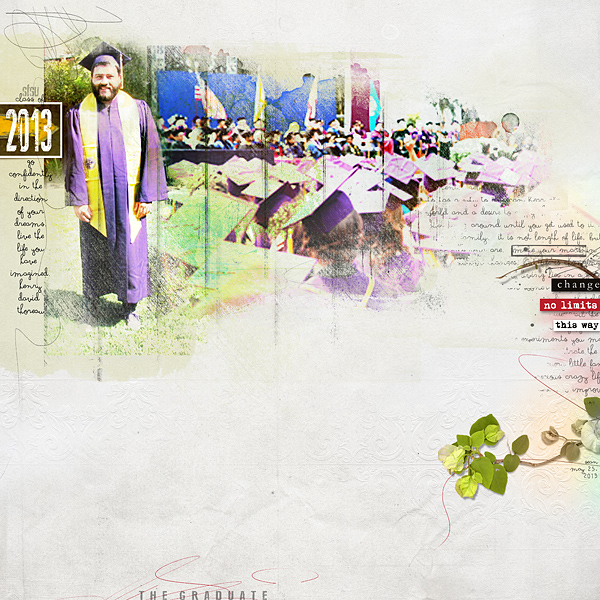
Go confidently in the direction of your dreams.
Live the life you have imagined.
-Henry David Thoreau
Yay! Our son graduated from college on Saturday, along with about 8,000 other students and 20,000 guests
the largest graduating class in the history of SFSU and my Alma Mater, too!
A joyous day for everyone, smiles all around, excited students and very proud parents!
Anna Aspnes Designs:
Artsy Layered Template No.100
https://www.oscraps.com/shop/product.php?productid=43444&cat=383&page=1
ArtPlay Palette Lush
https://www.oscraps.com/shop/product.php?productid=43466&cat=383&page=1
Stained Glows No.1
http://www.oscraps.com/shop/product.php?productid=33375&cat=383&page=1
WarmGlows No.5
http://www.oscraps.com/shop/product.php?productid=31895&cat=383&page=1
ScriptTease Life No.1
http://www.oscraps.com/shop/product.php?productid=29599&cat=383&page=1
ArtPlay Palette City Limits (word label)
http://www.oscraps.com/shop/product.php?productid=33810&cat=383&page=1
ArtPlay Palette Find My Way (word label)
http://www.oscraps.com/shop/product.php?productid=27640&cat=383&page=1
ArtPlay Palette Awaken (brush)
http://www.oscraps.com/shop/product.php?productid=43366&cat=383&page=1
Process: Blending graduate photo into the graduation ceremony with template layers and AP Transfers.
1. Place a light neutral background paper (AP Lush Solid Ppr1).
2. Select all (or just a few) paint and mask layers from ALT100. Rearrange, if necessary, to fit your design. Merge the layers.
Clip a darker neutral paper (AP Lush Solid Ppr2) to the merged layer.
This layer serves as a base for two blended photo layers to be added next.
3. (Create Photo Layer No.1) Place AP Lush Transfer2 above merged layers.
Clip Photo No.1 to the transfer. Set photo to pin light mode.
Duplicate Photo No.1 and set to screen mode.
4. (Create Photo Layer No.2) Place AP Lush Transfer2 above photo layer.
Clip AP Lush Artsy Ppr2 to transfer.
Duplicate paper and set to 50% vivid light.
Clip Photo No.2 to transfer above paper layers. Set photo to pin light.
5. (Blending the two photos) Duplicate Photo No.1, from step 3. Place and clip above Photo No.2 in step 4. Set to pin light.
6. (Optional) If necessary, duplicate Photo No.1 again and erase portions for further blending.
7. Choose a frame from ALT100. Place pattern and year into frame.
8. Add copy down left side.
9. Add Script Tease Life1 to right side. Duplicate and position both layers so that they flow to right edge. Adjust opacity to 60%.
10. Layer Sprig element from AP Lush to right edge.
11. Add word labels.
12. Add ArtStroke under Sprig.
13. Add title to bottom of page.
14. Add ArtStroke under title.
15. Add various Stained Glows 1 and Warm Glows 5 throughout page to enhance color, experimenting with blending modes/opacities.
Also try moving glows above and below selected layers for different effects.