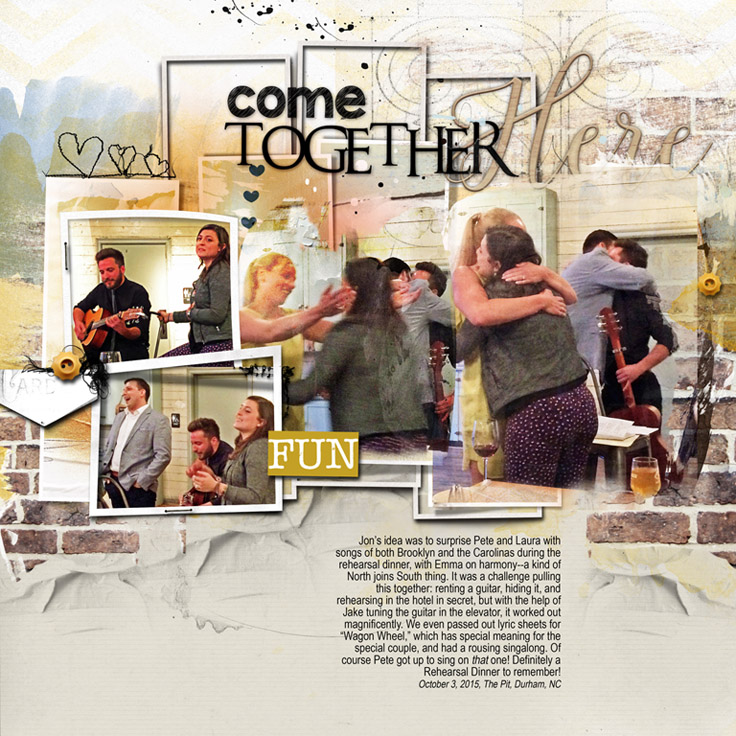
A page documenting the rehearsal dinner for my son's behind-the-scenes wedding album.
Products:
ArtsyLayeredTemplate 196, rotated: http://www.oscraps.com/shop/Artsy-Layered-Template-No.-196.html
Artplay Palettes:
Sun Fun (background paper, solid and patterned): http://www.oscraps.com/shop/ArtPlay-Palette-Sun-Fun.html
Shine (button, transfers): http://www.oscraps.com/shop/ArtPlay-Palette-Shine.html
Ablaze (frame): http://www.oscraps.com/shop/ArtPlay-Palette-Ablaze.html
Canyon (frame): http://www.oscraps.com/shop/ArtPlay-Palette-Canyon.html
Thrive (word art): http://www.oscraps.com/shop/ArtPlay-Palette-Thrive.html
Arrive (stitched paper, woodscript word): http://www.oscraps.com/shop/ArtPlay-Palette-Arrive.html
Bliss (swirl transfer): http://www.oscraps.com/shop/ArtPlay-Palette-Bliss.html
Home (brick overlay): http://www.oscraps.com/shop/ArtPlay-Palette-Home.html
Love Story ArtsyTransfer #4: http://www.oscraps.com/shop/ArtsyTransfers-Love-Story.html
Urban Stitchez: Hearts No. 1 http://www.oscraps.com/shop/UrbanStitchez-Hearts-No.-1.html
Korners http://www.oscraps.com/shop/UrbanStitchez-Korners-No.-1.html
Warping Frames No. 1: http://www.oscraps.com/shop/WarpingFrames-No.-1.html
Process:
After rotating the template I clipped papers from Sun Fun into each of the frame masks. I altered the central photo by clipping a copy of the photo to most of the layers in Love Story Artsy Transfer #4, then merging the layers and clipping to a transfer from the Shine Artplay Palette and putting it on top of the frames. I placed the framed photos in warped frames and clipped the last photoon the right in the sequenceto another transfer from the Shine Artplay Palette. I then recolored the stains and paints in the template, duplicated the taped texture a few times and moved it across the page, and turned off the visibility on a few textures and masks. I layered more frames behind the frames that had come with the template and slid in the brick transfers (since the rehearsal dinner venue was in a reconverted factory). I did the journaling, added the title and the woodscript word, and finished up the page by trimming with a few embellishments.