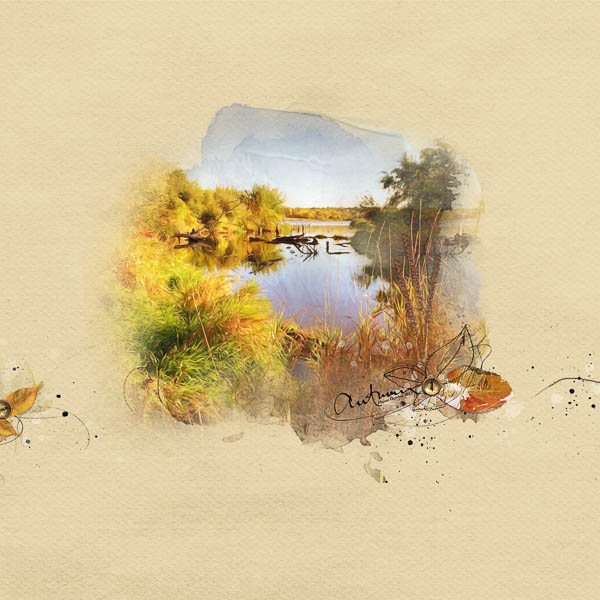
We don't have much fall color yet, but I was inspired by isDK's [url=
https://ozone.oscraps.com/gallery/showphoto.php?photo=318160&title=first-light&cat=1351]link[/url] beautiful page. This is a photo I shot last year at a nearby lake.
Anna Aspness
ArtPlay Palette Autumn Elegance [url=
http://www.oscraps.com/shop/product.php?productid=10010515&cat=383&page=1]ArtPlay Palette Autumn Elegance[/url]
Inked Words Autumn [url=
http://www.oscraps.com/shop/product.php?productid=10010509&cat=383&page=1]InkedWords Autumn No. 1[/url]
MultiMedia Branches No. 4 [url=
http://www.oscraps.com/shop/product.php?productid=10010514&cat=383&page=1]MultiMedia Branches No. 4[/url]
Urban Stitchez Leaves No. 1 [url=
http://www.oscraps.com/shop/product.php?productid=10010153&page=1]Urban Stitchez Leaves No. 1[/url]
Urban Threadz No. 4 [url=
http://www.oscraps.com/shop/product.php?productid=10009333&page=1]Urban Threadz No. 4[/url]
ArtPlay Palette Cultivate (brush) [url=
http://www.oscraps.com/shop/product.php?productid=10008557&page=1]ArtPlay Palette Cultivate[/url]
Leaf Sprinklez No. 1 [url=
http://www.oscraps.com/shop/product.php?productid=45213&page=1]LeafSprinklez No. 1[/url]
Spray Paint No. 2 [url=
http://www.oscraps.com/shop/product.php?productid=27966&page=1]Spray Paint No. 2[/url]
Different Strokes No. 4 [url=
http://www.oscraps.com/shop/product.php?productid=27959&page=1]Different Strokes No. 4[/url]
WaterColor FotoBlendz No. 3 [url=
http://www.oscraps.com/shop/product.php?productid=10008448&page=1]WaterColor FotoBlendz No. 3[/url]
Process: This layout began with a photo to which I applied a couple of filters by Topaz Labs to give a painted look. I then chose solid paper 1 from Autumn Elegance for the background. I attached my photo to transfer 6 and placed art stroke 1 above it, masking out the lines so that I had only the texture remaining. I duplicated the photo twice, changing the blend mode to soft light on the first copy and screen on the next one. I adjusted the opacity of both layers to about 40%. Above that I placed art stroke 2, masking out some of the vertical lines. I added a watercolor fotoblendz mask to extend my photo just below the transfer that I used as the first mask for my photo. Then I began working to give my layout a little more depth and dimension. I used three copies of the grass, adjusting the shadows and warping them a little before placing them above the grass in my photo. I thought it gave my photo a little of a 3D look. I used a layer mask to blend the stem bottoms into my photo. Next, I placed one of the new multimedia branches above the grass, reduced its size and attaching another copy of my photo to the stain. To finish my cluster, I added some stitched leaves just below the multimedia branch. To anchor my cluster, I used a button from the new art palette and stitched it down with some urban threads. I masked out portions of the word art, leaving only the word autumn and duplicated it to make it darker. Anna had sent out a link to a video on how to do this in her newsletter this morning. To pull the eye out, I created a second little cluster on the left with the same button, rotated it, and added a couple of leaf sprinkles. Below that is a stroke and brush to which I attached another copy of my photo. I added some white dripped stains and black splatters just above the paper. As my final edit, I turned off everything but the paper and moved up my layers panel, turning the layers back on and checking that my layout looked as I wanted it to look.